graph LR
subgraph User
browser[Browser]
end
subgraph URL Configuration
urls[urls.py]
end
subgraph View Logic
views[views.py]
end
subgraph Templates
home[home.html]
end
subgraph Models
models[models.py]
end
browser --> |Request| urls
urls --> |URL routing| views
views --> |Render| home
home --> |User interaction| views
views --> |Query| models
models --> |Database operations| views
4 MVP - Minimal Viable Product
4.1 Django Project Examples for MVP
4.1.1 QuizMaker
- Code: https://www.photondesigner.com/articles/quiz-htmx
- Video: https://www.photondesigner.com/articles/quiz-htmx
- Showcase:
https://replit.com/@ozmrchen/quiz24
4.1.2 Wagtail
- https://docs.wagtail.org/en/stable/getting_started/tutorial.html
- Code: TBA
4.1.3 Django-CRM (Customer Relationship Management)
- Code: https://github.com/flatplanet/Django-CRM
- Video: https://www.youtube.com/watch?v=t10QcFx7d5k&t=5680s
- Showcase:
https://replit.com/@ozmrchen/crm24
4.1.4 Staff-Checkin app for Cybersecurity Case Study
- https://gitlab.sod.thaac.net/jchen/staff-checkin
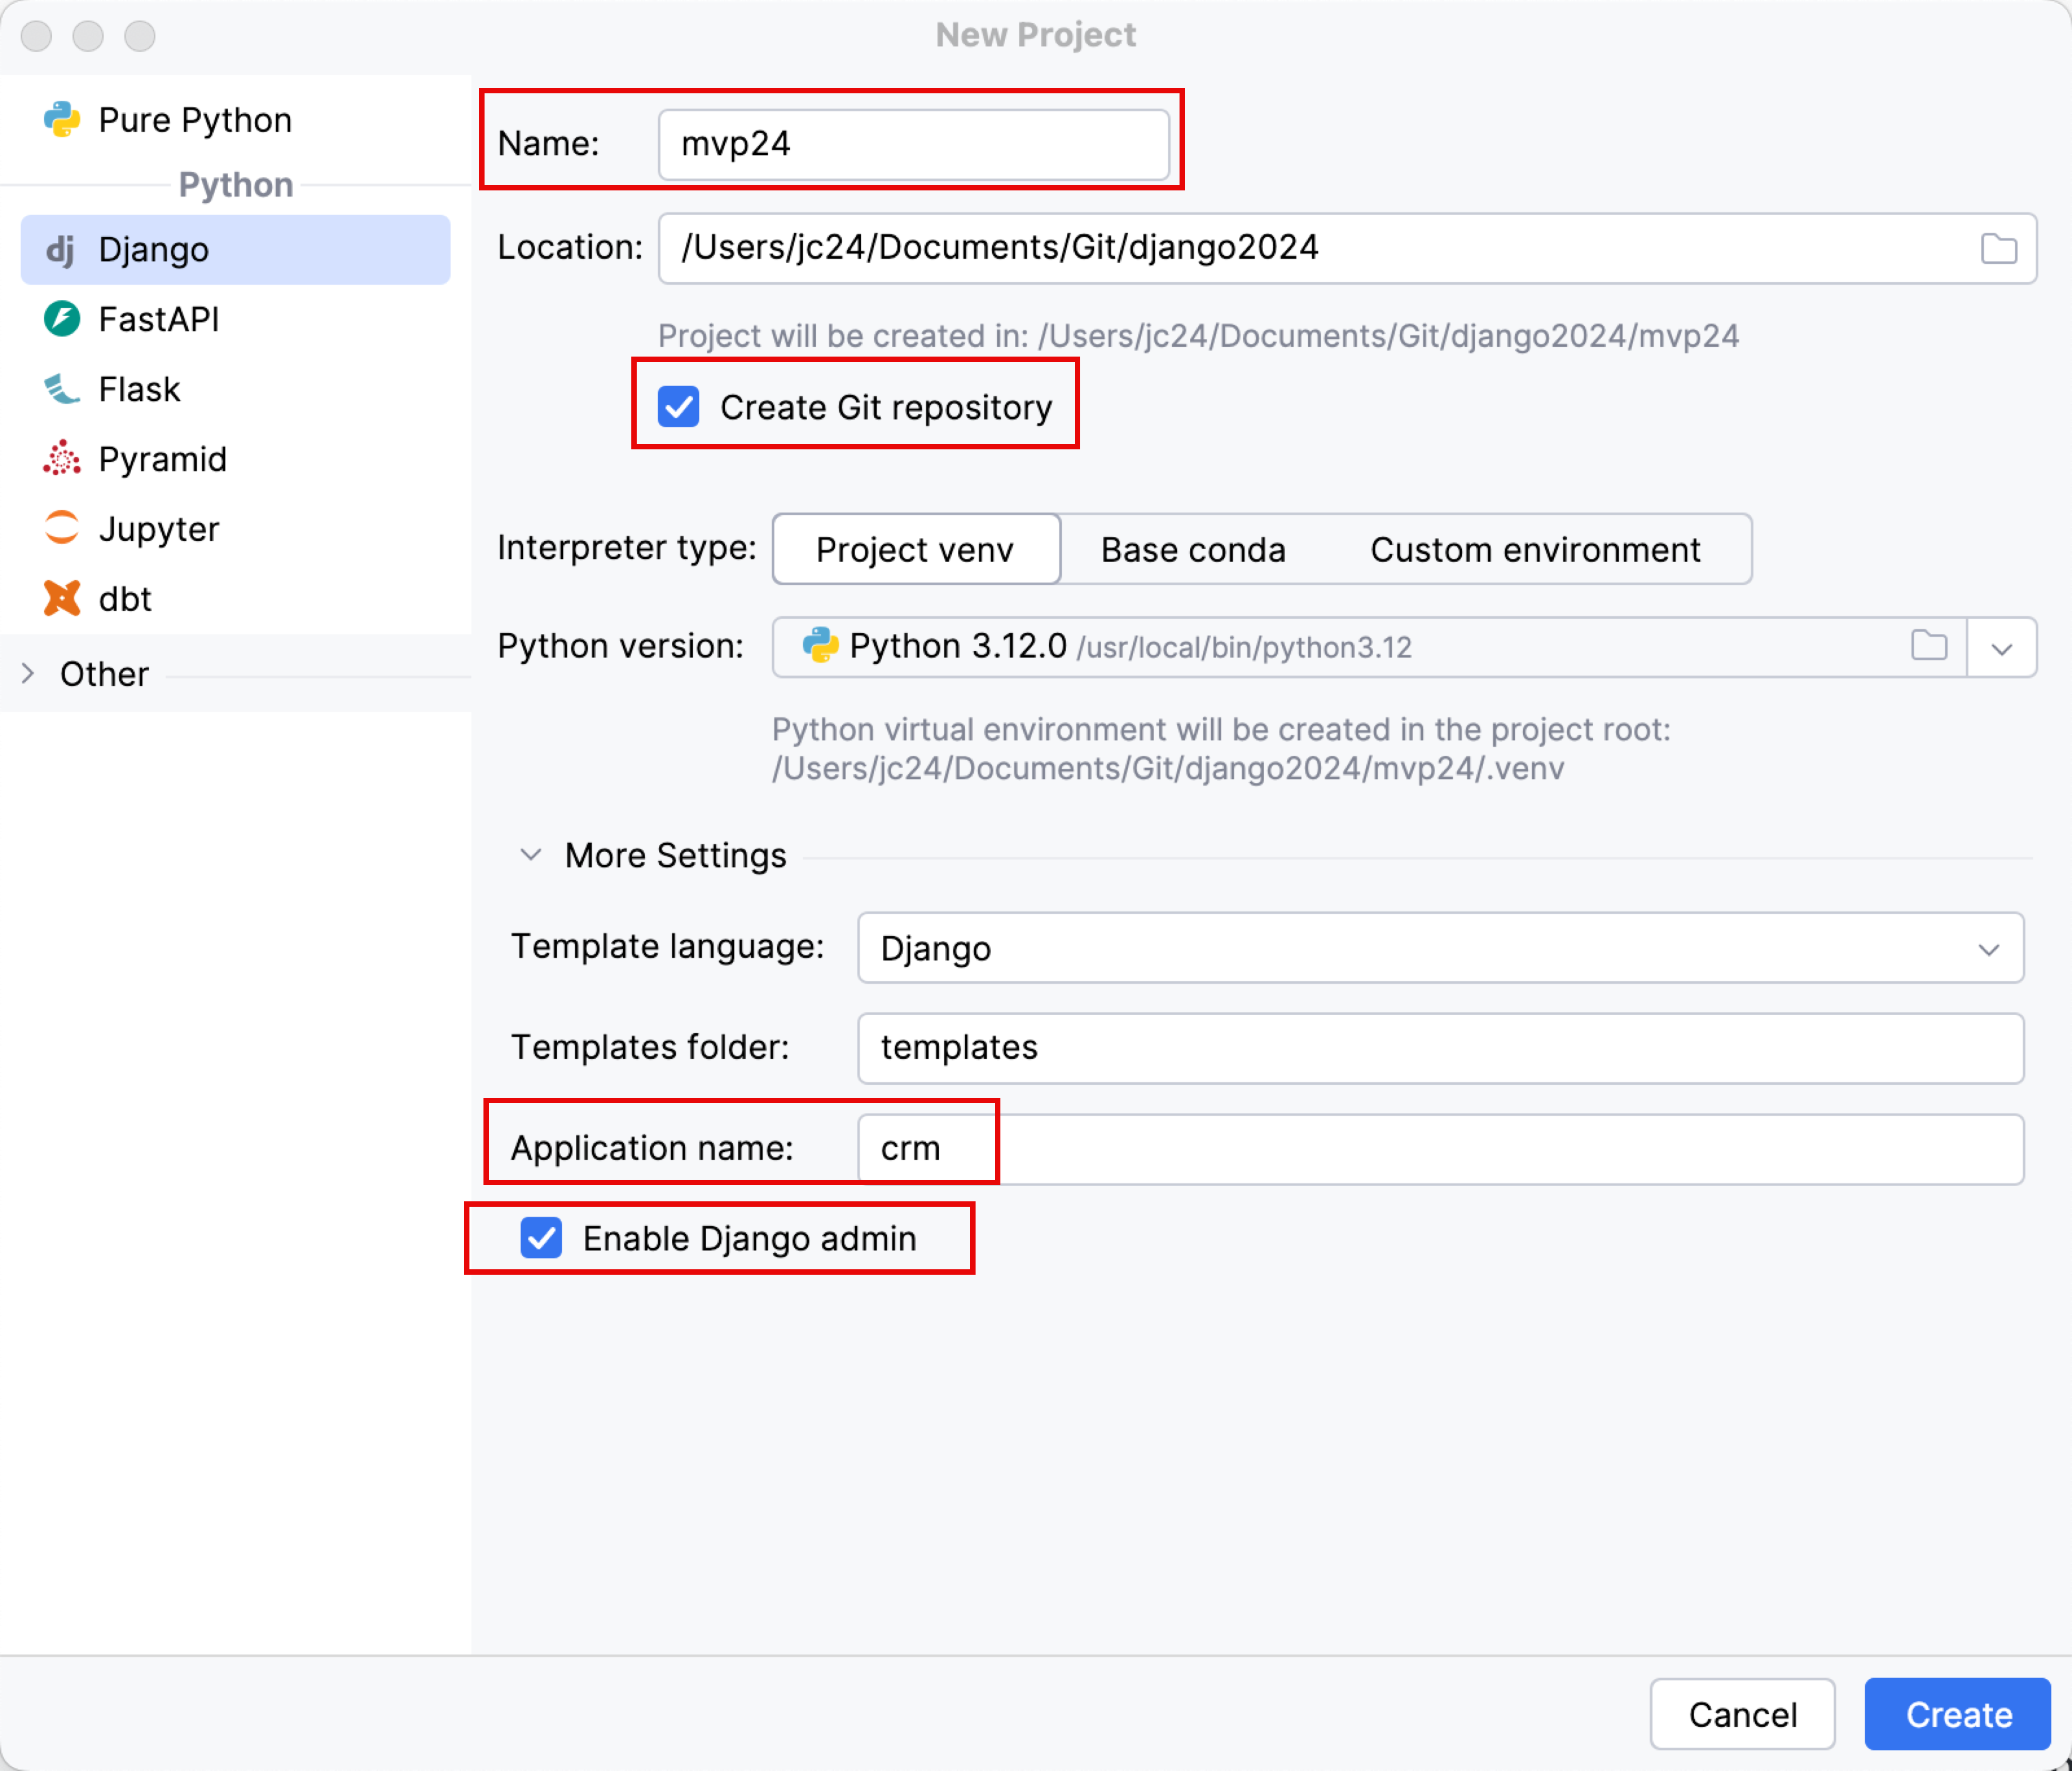
4.2 MVP - CRM App Setup
4.2.1 Demonstration
Video: https://youtu.be/t10QcFx7d5k?si=Al0WMFWr_ULz88zQ&t=21
4.2.2 Setup
If your project is not working, please start from the scratch.
- 🔲 Directory: go to your project directory or create one call
mvp24 - 🔲❗️ Create your project: (skip this if you have a project ready)
django-admin startproject mvp24
- 🔲 Create an app named
crmdjango manage.py startapp crm
- 🔲 Add
crmtoINSTALLED_APPSinsettings.py - ⛔️ Do not change the database setting: We will use sqlite instead of MySQL
- so no need to
pip install mysqlor configurate MySQL
- so no need to
- 🔲 Create a super user for Django
python manage.py createsuperuser
- 🔲 Run your Django server
python manage.py runserver
4.2.3 Version Control
Video: https://youtu.be/t10QcFx7d5k?si=BO0gRsr6VShGO-qz&t=800
4.2.3.1 Use Gitlab
# Navigate to your local repository directory
cd /path/to/your/local/repository

# Set the local configuration for your GitLab username and email
git config user.name "Your Name"
git config user.email "you@youraddress.com"

# Set the local configuration for the push behavior
git config push.default matching

# Set a local alias (optional)
git config alias.co checkout

# Initialize the repository (if not already initialized)
git init

# Set the remote URL for your GitLab repository
git remote add origin https://gitlab.com/yourusername/your-repo.git
4.2.3.2 Use Github
git config --global user.name "Your Name"
git config --global user.email "you@youraddress.com"
git config --global push.default matching
git config --global alias.co checkout
git init
4.2.3.3 Start the version control system (VCS) on your project
- 🔲 Start VCS:
git init - 🔲 Add all files to VCS:
git add . - 🔲 Commit file changes to VCS:
git commit -am 'Initial Commit'- ‘Initial Commit’ is the coding note.
- 🔲 Set up the git remote repository and push changes to it. See below:
git remote add origin git@github.com:flatplanet/Django-CRM.git
git branch -M main
git push -u origin main
4.3 MVP - Home Page
Completed Code: https://github.com/jeremy886/mvp24/tree/ec71aeb7c48ee5e5e2b8eedc4720618277ed31e9
Video: https://youtu.be/t10QcFx7d5k?si=D3wa7dbGskr4b9b0&t=1095
✅Add this data flow digram digram to your SAT6 portoflio
4.3.1 What is MTV and Why
The Model-Template-View (MTV) pattern is Django’s approach to organizing web applications, similar to the Model-View-Controller (MVC) pattern used in other frameworks. It helps separate concerns within an application, making it easier to manage and maintain by allowing developers to work on the data, logic, and presentation layers independently.
4.3.2 Model-Template-View (MTV) in Django
Django’s architecture is built on the Model-Template-View pattern, which emphasizes a clear separation of concerns:
- Model:
- Role: Represents the data structure and is typically mapped to a database table.
- Functionality: Defines the data schema using Python classes, handles database queries, and enforces business rules and constraints.
- Template:
- Role: Manages the presentation layer, responsible for rendering HTML content to be sent to the client.
- Functionality: Uses Django’s templating language to dynamically generate HTML pages based on the context passed from views.
- View:
- Role: Acts as the intermediary between models and templates, handling HTTP requests and responses.
- Functionality: Fetches data from models, processes it (if needed), and renders a template with the data to produce an HTTP response.
4.3.3 Benefits of MTV in Django
- Modularity: Clear separation of concerns allows developers to work on different parts of the application independently.
- Reusability: Models and templates can be reused across different views, promoting code reuse.
- Maintainability: Changes in the data model or presentation can be made with minimal impact on other parts of the application.
4.3.4 Before you start, review the key files we are working on:
- project name: your project name or
mvp24 - app name: crm
- edit project
urls.py(inside the project folder withsettings.py) - create app
urls.py(inside the app folder) - create app
views.py- show the home page using
homeview
- show the home page using
- create template
home.html- say
Hello World! - use the template language
{% extends 'base.html' %}to use the base template - place your home page content
Hello World!inside{% block content %} {% endblock %}
- say
- create base
base.html- create the base template
base.html - use Bootstrap to make your webpages pretty
- use
{% block content %} {% endblock %}
- create the base template
MVP Pattern
4.3.5 Setup in PyCharm:
4.3.6 Edit Settings
Add the app to settings.py
INSTALLED_APPS = [
    'django.contrib.admin',
    'django.contrib.auth',
    'django.contrib.contenttypes',
    'django.contrib.sessions',
    'django.contrib.messages',
    'django.contrib.staticfiles',
    'crm.apps.CrmConfig',
]
💡If you haven’t ajdusted LANGUAGE_CODE and TIME_ZONE, you should do it now and add comments to it.
4.3.7 URL dispatcher
Project urls.py
from django.contrib import admin
from django.urls import path, include

urlpatterns = [
    path('admin/', admin.site.urls),
    path('', include('crm.urls')),
]
App urls.py
from django.urls import path
from . import views


urlpatterns = [
    path('', views.home, name='home'),
]
4.3.8 Home page view
from django.shortcuts import render


def home(request):
  records = {}  # This is an empty directory. We will add data later
  return render(request, 'crm/home.html', {'records': records})
4.3.9 Template home.html
We will create the templates folder in our root directory and then create the crm folder under it to store template files for crm app.
Basic home.html
<h1> Hello World!</h1>More complicated templates:
- base.html for every web page (Layout)
- home.html to be embedded inside the layout
Because of the structure, we will place:
home.htmlundertemplates/crmbase.htmlundertemplatesnavbar.htmlundertemplates
base.html
<!doctype html>
<html lang="en">
  <head>
    <meta charset="utf-8">
    <meta name="viewport" content="width=device-width, initial-scale=1">
    <title>Django CRM</title>
    <link href="https://cdn.jsdelivr.net/npm/bootstrap@5.3.0-alpha1/dist/css/bootstrap.min.css" rel="stylesheet" integrity="sha384-GLhlTQ8iRABdZLl6O3oVMWSktQOp6b7In1Zl3/Jr59b6EGGoI1aFkw7cmDA6j6gD" crossorigin="anonymous">
  </head>
  <body>
    {% include 'navbar.html' %}

      {% block content %}
      {% endblock%}

    <script src="https://cdn.jsdelivr.net/npm/bootstrap@5.3.0-alpha1/dist/js/bootstrap.bundle.min.js" integrity="sha384-w76AqPfDkMBDXo30jS1Sgez6pr3x5MlQ1ZAGC+nuZB+EYdgRZgiwxhTBTkF7CXvN" crossorigin="anonymous"></script>
  </body>
</html>
home.html
{% extends 'base.html' %}

{% block content %}
<h1> Hello World!</h1>
{% endblock %}
4.3.10 Better Appearance with Bootstrap:
Video: https://youtu.be/t10QcFx7d5k?si=0nZ-e2LDICWagk-q&t=1306
- use
containerto make your home page pretty - add a navigation bar using
{% include 'navbar.html' %} - change the navbar style to your liking
- update your navbar
Write an internal document in navbar.html and explain your UI design choice:
<!-- Navigation bar -->
<nav class="navbar navbar-expand-lg navbar-dark bg-dark">
  <div class="container-fluid">
    <!-- Brand name and link to home -->
    <a class="navbar-brand" href="{% url 'home' %}">Django CRM</a>
    <!-- Button for toggling the navbar on small screens -->
    <button class="navbar-toggler" type="button" data-bs-toggle="collapse" data-bs-target="#navbarSupportedContent" aria-controls="navbarSupportedContent" aria-expanded="false" aria-label="Toggle navigation">
      <span class="navbar-toggler-icon"></span>
    </button>
    <!-- Navbar content -->
    <div class="collapse navbar-collapse" id="navbarSupportedContent">
      <ul class="navbar-nav me-auto mb-2 mb-lg-0">
        <li class="nav-item">
          <a class="nav-link" href="{% url 'home' %}">Login</a>
        </li>
      </ul>
    </div>
  </div>
</nav>
🔲 Identify the comments in this template file.
🔲 Why are they useful or not useful?
4.3.11 Submit MVP Homepage screenshot
✅ Now capture your result to SAT6 portfolio
4.4 MVP - About Page
This Django software system, called Super Learning Toy, is designed to assist teachers in teaching and students in learning within the classroom. It offers users an intuitive home page where they can access the main functions of the system. Currently, the primary interaction is for users to view the home page, which serves as the gateway to the various educational tools and resources provided by the application. As the next step in enhancing the system, an About Page will be created to introduce the designers and developers behind Super Learning Toy. This page will serve as an online resume, showcasing the team’s expertise and the collaborative effort that went into developing this innovative educational platform.
4.4.1 Functional Requirement
ID: FR-001
Title: Viewing the Home Page and About Page
Description:
The system shall allow users to view the home page and access the about page from the home page. The about page will provide information about the designers and developers of the system.
Details
1. View Home Page
- Inputs:
- User navigates to the home page URL.
- Sequence of Operations (Processing):
- User enters the home page URL in the web browser.
- The web browser sends a request to the server for the home page.
- The server processes the request and retrieves the home page content.
- The server sends the home page content back to the web browser.
- The web browser renders and displays the home page.
- Outputs:
- The user sees the home page with available functions and navigation options.
2. View About Page
- Inputs:
- User clicks on the “About” link or button on the home page.
- Sequence of Operations (Processing):
- User clicks on the “About” link or button on the home page.
- The web browser sends a request to the server for the about page.
- The server processes the request and retrieves the about page content.
- The server sends the about page content back to the web browser.
- The web browser renders and displays the about page.
- Outputs:
- The user sees the about page with information about the designers and developers.
Scope
- The home page must be implemented and accessible.
- The about page must be implemented and contain relevant information about the designers and developers.
4.4.2 Use Case Diagram
4.4.3 Create About Page
✅ Feel free to create another similar page that can be done using the same skills.
•   From your SRS, select one relevant functional requirement.
•   Draw the use case diagram.
•   Implement this in your MVP.
•   🔲 Take a screenshot of your use case diagram (UCD).
•   🔲 Take a screenshot of your About page.
🛠️ Use Case Digram Drawing Tool
Diagram Code
digraph G {
    rankdir=LR;  # Left to right layout

    # Node with an emoji
    User [label="👤 User", shape=none, fontsize=24];

    # System Boundary with increased size
    subgraph cluster_0 {
        label = "Django Software System";
        color = blue;
        margin = 15.0;  # Increase margin for the boundary box

        # Use Case
        ViewHomePage [label="View Home Page", shape=ellipse, style=filled, color=lightgrey];
        ViewAboutPage [label="View About Page", shape=ellipse, style=filled, color=lightgrey];

        # Arrange nodes
        {rank=same; ViewHomePage; ViewAboutPage;}
    }

    # Relationships
    User -> ViewHomePage;

    # Extend Relationship
    ViewAboutPage -> ViewHomePage [label="<<extends>>", style=dashed, color=green];
}
4.4.4 Add Images To Template
You can use your own images in your template files. For example:
templates/crm/home.html
{% extends 'base.html' %}

{% load static %}
{% block content %}
    <h1>Weclome to Cool Code Coach Membership Management</h1>
    <img src="{% static 'crm/images/crm_home.webp' %}" width="500" alt="Hi!"/>
    <br/>
    Developer: {{ records.developer }}
{% endblock %}
Tip
- Ensure
STATICFILES_DIRS = [BASE_DIR / 'static']is set insettings.py. - Place the
crm_home.webpfile instatic/crm/images. - Use the command
{% load static %}before{% static 'crm/images/crm_home.webp' %}.
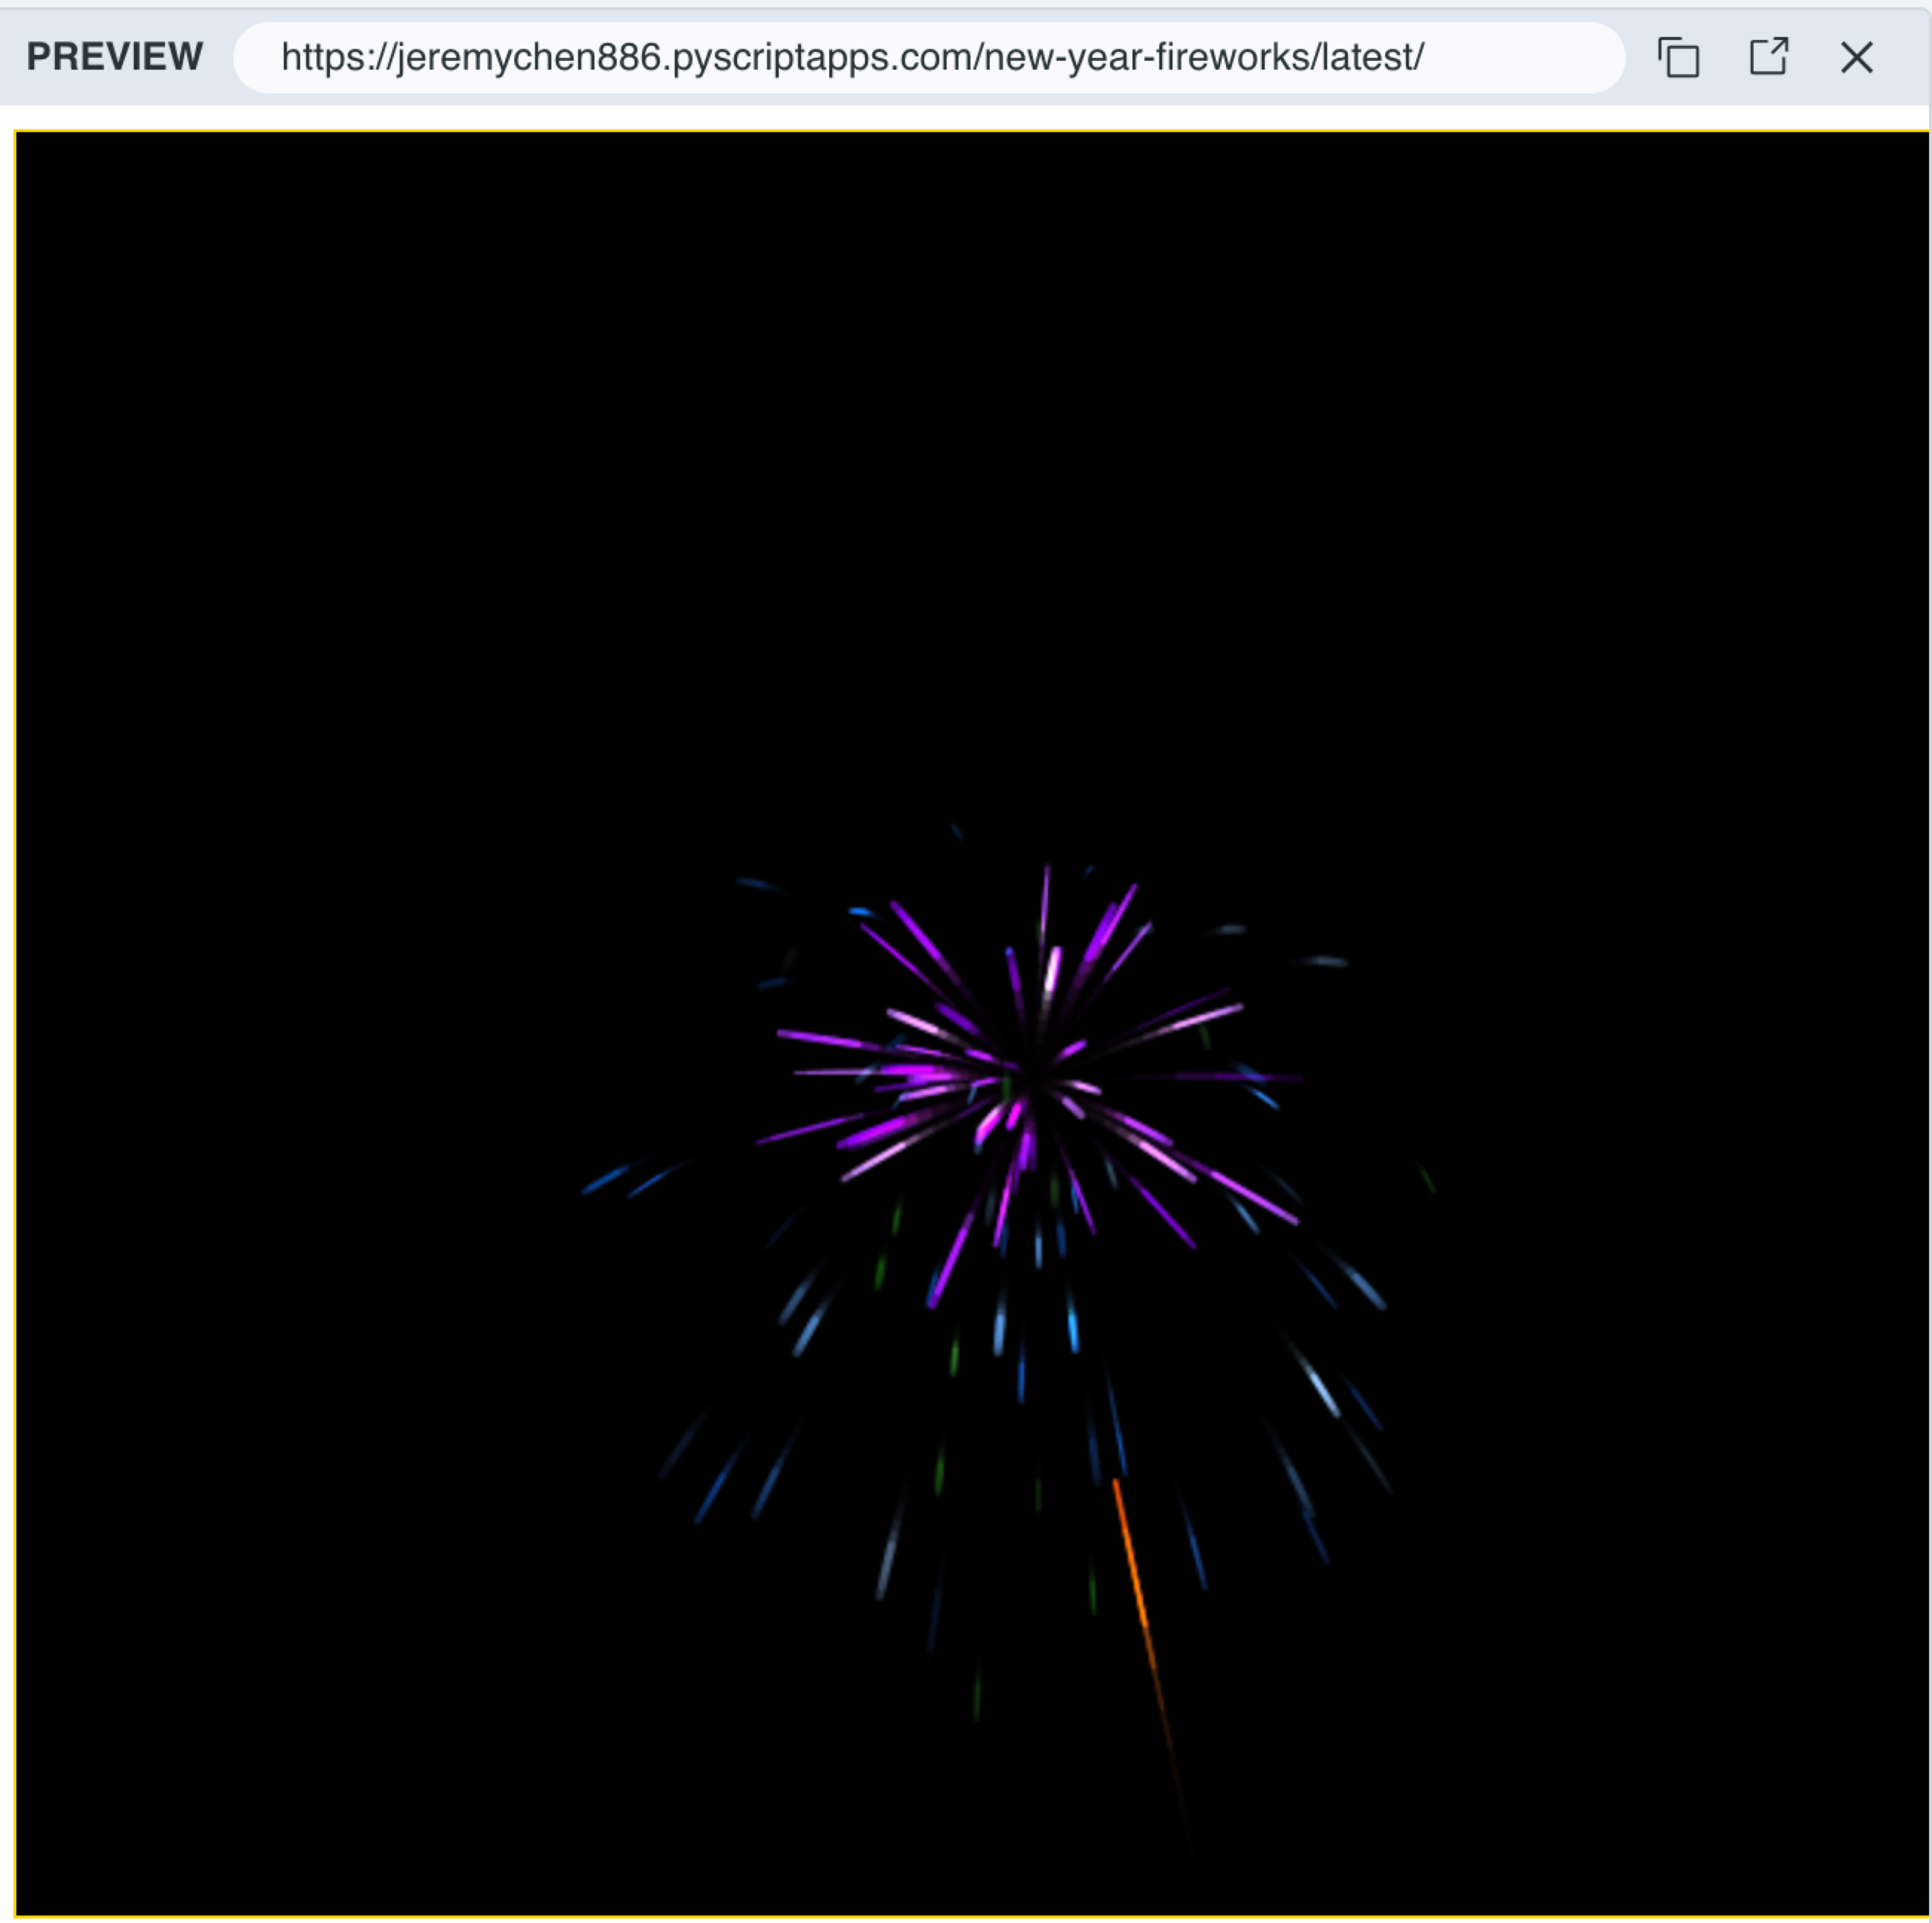
4.4.5 Prototyping
If you want to build a function in Django, you can start with a mock-up on a web page, using only urls.py, views.py, and mockup.html.
Why not try a fun project like this: https://jeremychen886.pyscriptapps.com/new-year-fireworks/
4.4.6 Bootstrap Studio
If you like to drag and drop to create web pages, you can try Bootstrap Studio.
4.5 MVP - Users
Completed Code: https://github.com/jeremy886/mvp24/tree/084e9ccc3de7a6d2c8188dbf8e37976a3eb2de6d
Guide: https://developer.mozilla.org/en-US/docs/Learn/Server-side/Django/Authentication
4.5.1 Git Status (File changes)
git status
On branch main
Your branch is up to date with 'origin/main'.

Changes to be committed:
  (use "git restore --staged <file>..." to unstage)
        new file:   templates/registration/login.html

Changes not staged for commit:
  (use "git add <file>..." to update what will be committed)
  (use "git restore <file>..." to discard changes in working directory)
        modified:   mvp24/settings.py
        modified:   mvp24/urls.py
        modified:   templates/navbar.html
        modified:   templates/registration/login.html
4.5.2 Database v Object-Relational-Mapper
Django uses an Object-Relational-Mapper (ORM) to map model definitions in the Django code to the data structure used by the underlying database. As we change our model definitions, Django tracks the changes and can create database migration scripts to automatically migrate the underlying data structure in the database to match the model.
When we created the website, Django automatically added a number of models for use by the admin section of the site (which we’ll look at later). Run the following commands to define tables for those models in the database (make sure you are in the directory that contains manage.py):
python3 manage.py makemigrations
python3 manage.py migrate
Warning
Run these commands whenever you make changes to your models that affect the database structure, such as adding or removing models or fields.
4.5.3 Creating users and groups
4.5.3.1 Creating a superuser
To log into the admin site, you need a user account with Staff status. To view and create records, the user must have permissions to manage all objects. You can create a “superuser” account with full access and all necessary permissions using manage.py.
python3 manage.py createsuperuser4.5.4 Logging in and using the site
To login to the site, open the /admin URL (e.g. http://127.0.0.1:8000/admin) and enter your new superuser userid and password credentials.
You can click the Users or Groups links to see their existing records.
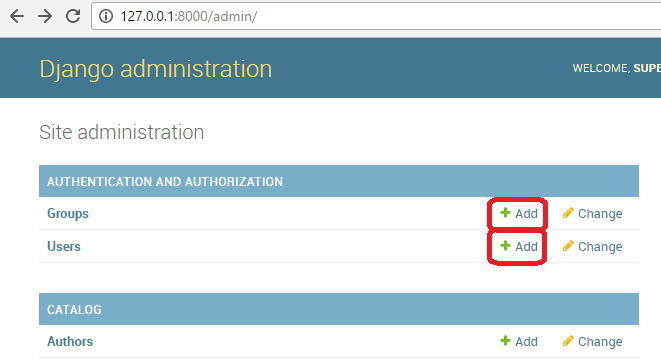
Click the Add button next to Users to open the Add user dialog box.
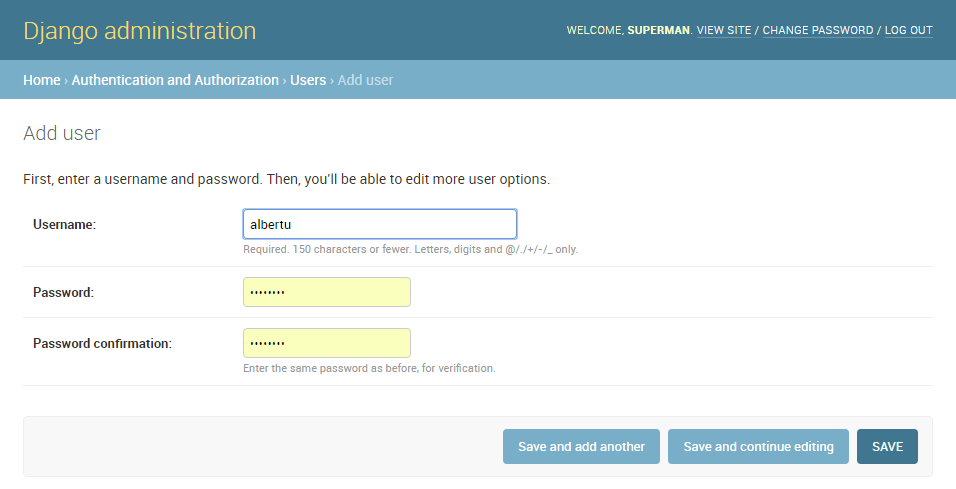
Or create users manually as shown below.
source .venv/bin/activate
python manage.py shell
# Get current user model from settings
from django.contrib.auth import get_user_model
User = get_user_model()
# Create user from model and save to the database
user = User.objects.create_user('myusername', 'myemail@myschool.com', 'mypassword')
# Update fields and then save again
user.first_name = 'Jeremy'
user.last_name = 'Chen'
user.save()4.5.5 Setting up your authentication views
Project URLs
urlpatterns = [
    path('admin/', admin.site.urls),
    path('accounts/', include('django.contrib.auth.urls')),  # Added
    path('', include('crm.urls')),
]
This gives your these URLs and mappings:
accounts/ login/ [name='login']
accounts/ logout/ [name='logout']
accounts/ password_change/ [name='password_change']
accounts/ password_change/done/ [name='password_change_done']
accounts/ password_reset/ [name='password_reset']
accounts/ password_reset/done/ [name='password_reset_done']
accounts/ reset/<uidb64>/<token>/ [name='password_reset_confirm']
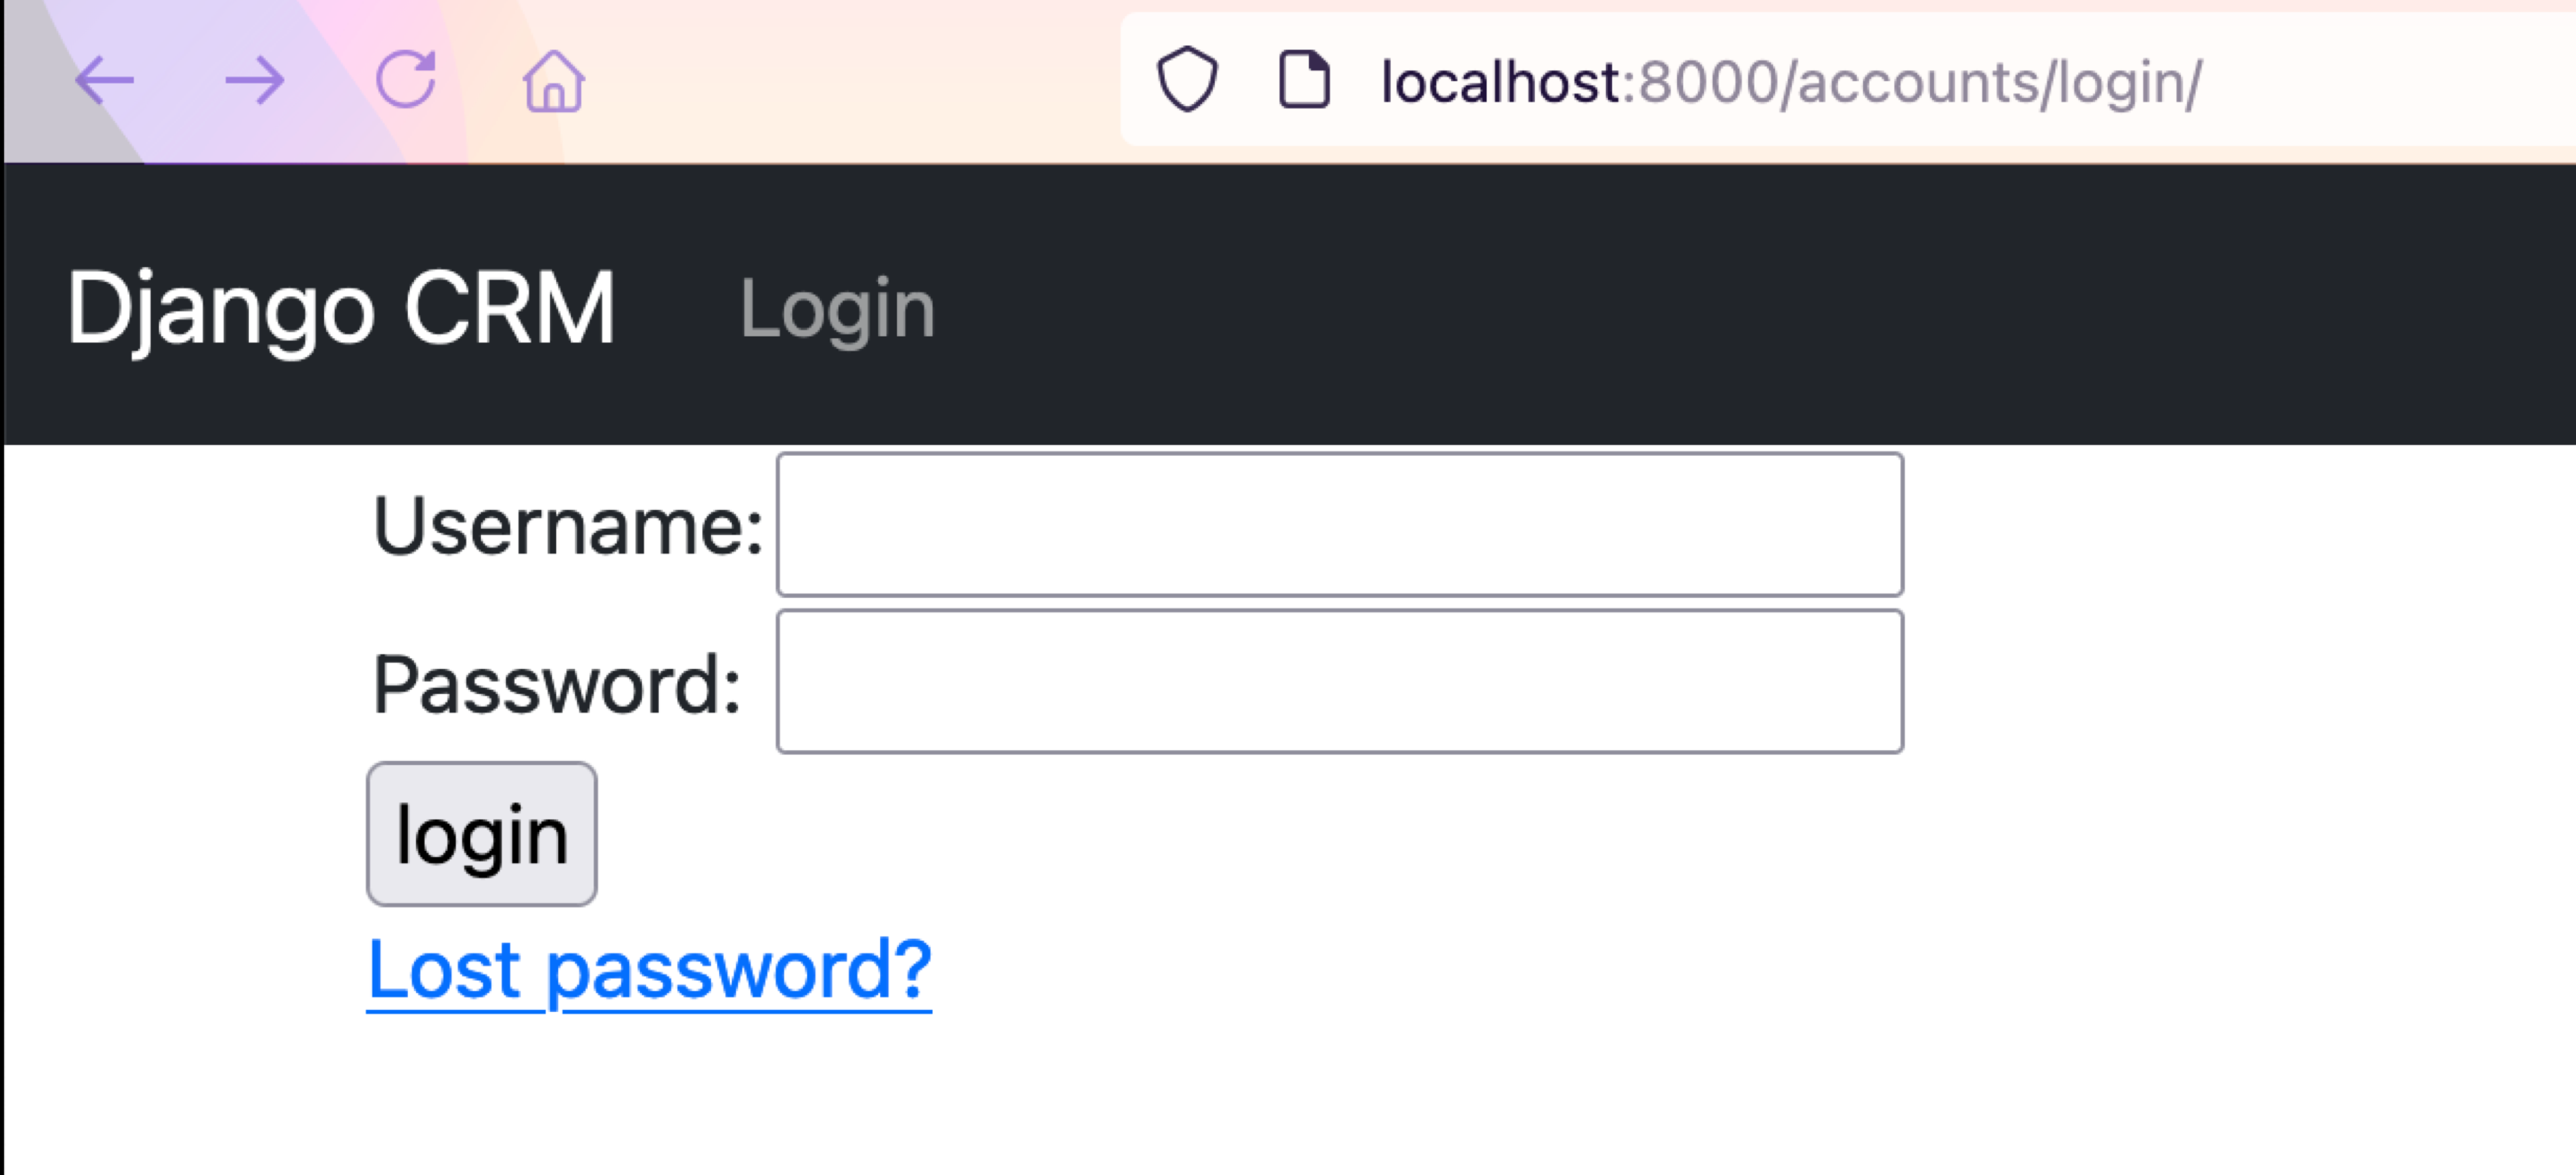
accounts/ reset/done/ [name='password_reset_complete']4.5.6 Login Template Web Page
The URLs (and implicitly, views) that we just added expect to find their associated templates in a directory /registration/ somewhere in the templates search path.
For this site, we’ll put our HTML pages in the templates/registration/ directory.
login.html
{% extends "base.html" %}

{% block content %}

    {% if form.errors %}
        <p>Your username and password didn't match. Please try again.</p>
    {% endif %}

    {% if next %}
        {% if user.is_authenticated %}
            <p>Your account doesn't have access to this page. To proceed,
                please login with an account that has access.</p>
        {% else %}
            <p>Please login to see this page.</p>
        {% endif %}
    {% endif %}

    <form method="post" action="{% url 'login' %}">
        {% csrf_token %}
        <table>
            <tr>
                <td>{{ form.username.label_tag }}</td>
                <td>{{ form.username }}</td>
            </tr>
            <tr>
                <td>{{ form.password.label_tag }}</td>
                <td>{{ form.password }}</td>
            </tr>
        </table>
        <input type="submit" value="login">
        <input type="hidden" name="next" value="{{ next }}">
    </form>

    {# Assumes you set up the password_reset view in your URLconf #}
    <p><a href="{% url 'password_reset' %}">Lost password?</a></p>

{% endblock %}
Navigate back to the login page http://127.0.0.1:8000/accounts/login/ once you’ve saved your template, and you should see something like this:
If you log in using valid credentials, you’ll be redirected to another page (by default this will be http://127.0.0.1:8000/accounts/profile/). The problem is that, by default, Django expects that upon logging in you will want to be taken to a profile page, which may or may not be the case. As you haven’t defined this page yet, you’ll get another error!
Open the project settings settings.py and add the text below to the bottom. Now when you log in you should be redirected to the site homepage by default.
# Redirect to home URL after login (Default redirects to /accounts/profile/)
LOGIN_REDIRECT_URL = '/'
# Also redirect to home after logout
LOGOUT_REDIRECT_URL = '/'
4.5.7 Navigation Bar
Step 1: Fix Login
- Change the link from
hometologinin the Navbarhref="{% url 'home' %}". - Now when you click
Login, a login form will be shown.
Step 2: Add Logout
- Logout is a POST-only form or an invisible form
        <!-- Navbar content -->
                ...
                <li class="nav-item">
                    <form id="logout-form" method="post" action="{% url 'logout' %}">
                        {% csrf_token %}
                        <button type="submit" class="btn btn-link nav-link">Logout</button>
                    </form>
                </li>
Step 3: Greet User
- Add Hello User as a
nav-item. - To align to the right, start another
ul. - It’s not a link so we use
navbar-text.
        <!-- Navbar content -->
            ...
            <ul class="navbar-nav ml-auto mb-2 mb-lg-0">
                <li class="nav-item">
                    <span class="navbar-text">Hello {{ user.get_username }}</span>
                </li>
            </ul>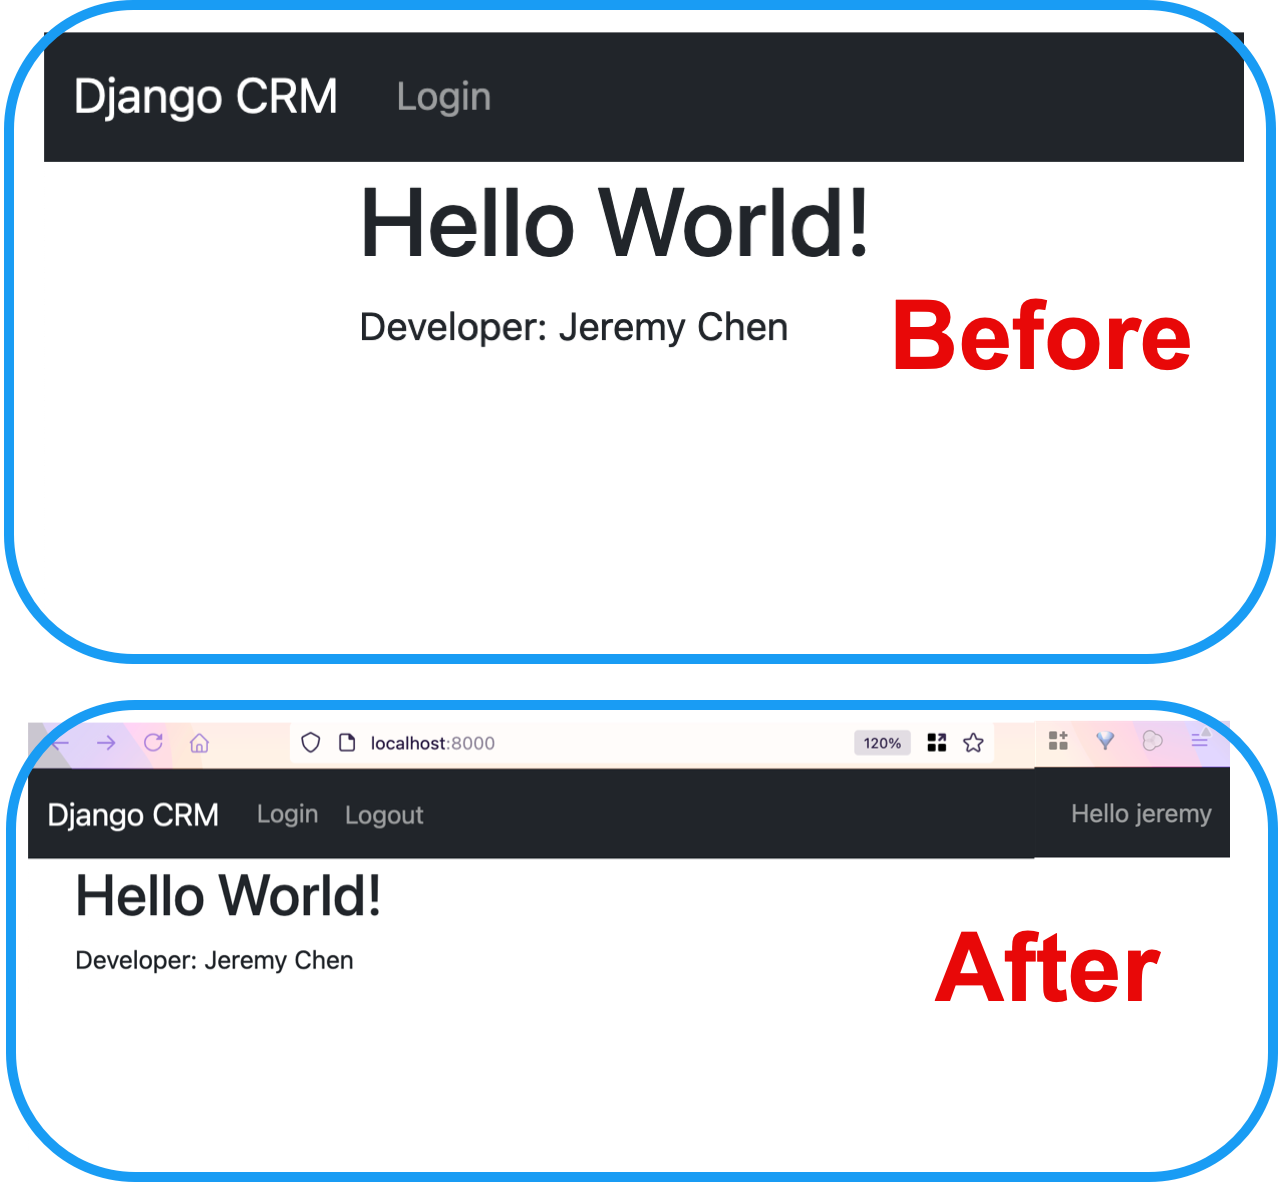
Step 4: Dynamic Navbar
- If a user is not logged in, then display the Login button and hide the Logout.
- If a user is logged in, then display the Logout button and hide the Login.
This is the final version.
        <!-- Navbar content -->
        <div class="collapse navbar-collapse" id="navbarSupportedContent">
            <ul class="navbar-nav me-auto mb-2 mb-lg-0">
                {% if not user.is_authenticated %}
                    <li class="nav-item">
                        <a class="nav-link" href="{% url 'login' %}">Login</a>
                    </li>
                {% else %}
                    <li class="nav-item">
                        <form id="logout-form" method="post" action="{% url 'logout' %}">
                            {% csrf_token %}
                            <button type="submit" class="btn btn-link nav-link">Logout</button>
                        </form>
                    </li>
                {% endif %}
            </ul>
            <ul class="navbar-nav ml-auto mb-2 mb-lg-0">
                <li class="nav-item">
                    <span class="navbar-text">Hello {{ user.get_username }}</span>
                </li>
            </ul>
        </div>
4.6 MVP - Model: Record
4.6.1 Git Status (File changes)
git status
On branch main
Your branch is up to date with 'origin/main'.

Changes not staged for commit:
  (use "git add <file>..." to update what will be committed)
  (use "git restore <file>..." to discard changes in working directory)
        modified:   crm/admin.py
        modified:   crm/models.py
4.6.2 Create your Record model
4.6.2.1 Record Model
Add the Record model to models.py:
from django.db import models


class Record(models.Model):
    created_at = models.DateTimeField(auto_now_add=True)
    first_name = models.CharField(max_length=50)
    last_name = models.CharField(max_length=50)
    email = models.CharField(max_length=100)
    phone = models.CharField(max_length=15)
    address = models.CharField(max_length=100)
    city = models.CharField(max_length=50)
    state = models.CharField(max_length=50)
    zipcode = models.CharField(max_length=20)

    def __str__(self):
        """
        Display the first name and last name in the Django Admin.
        """
        return (f"{self.first_name} {self.last_name}")
Record Object Description: 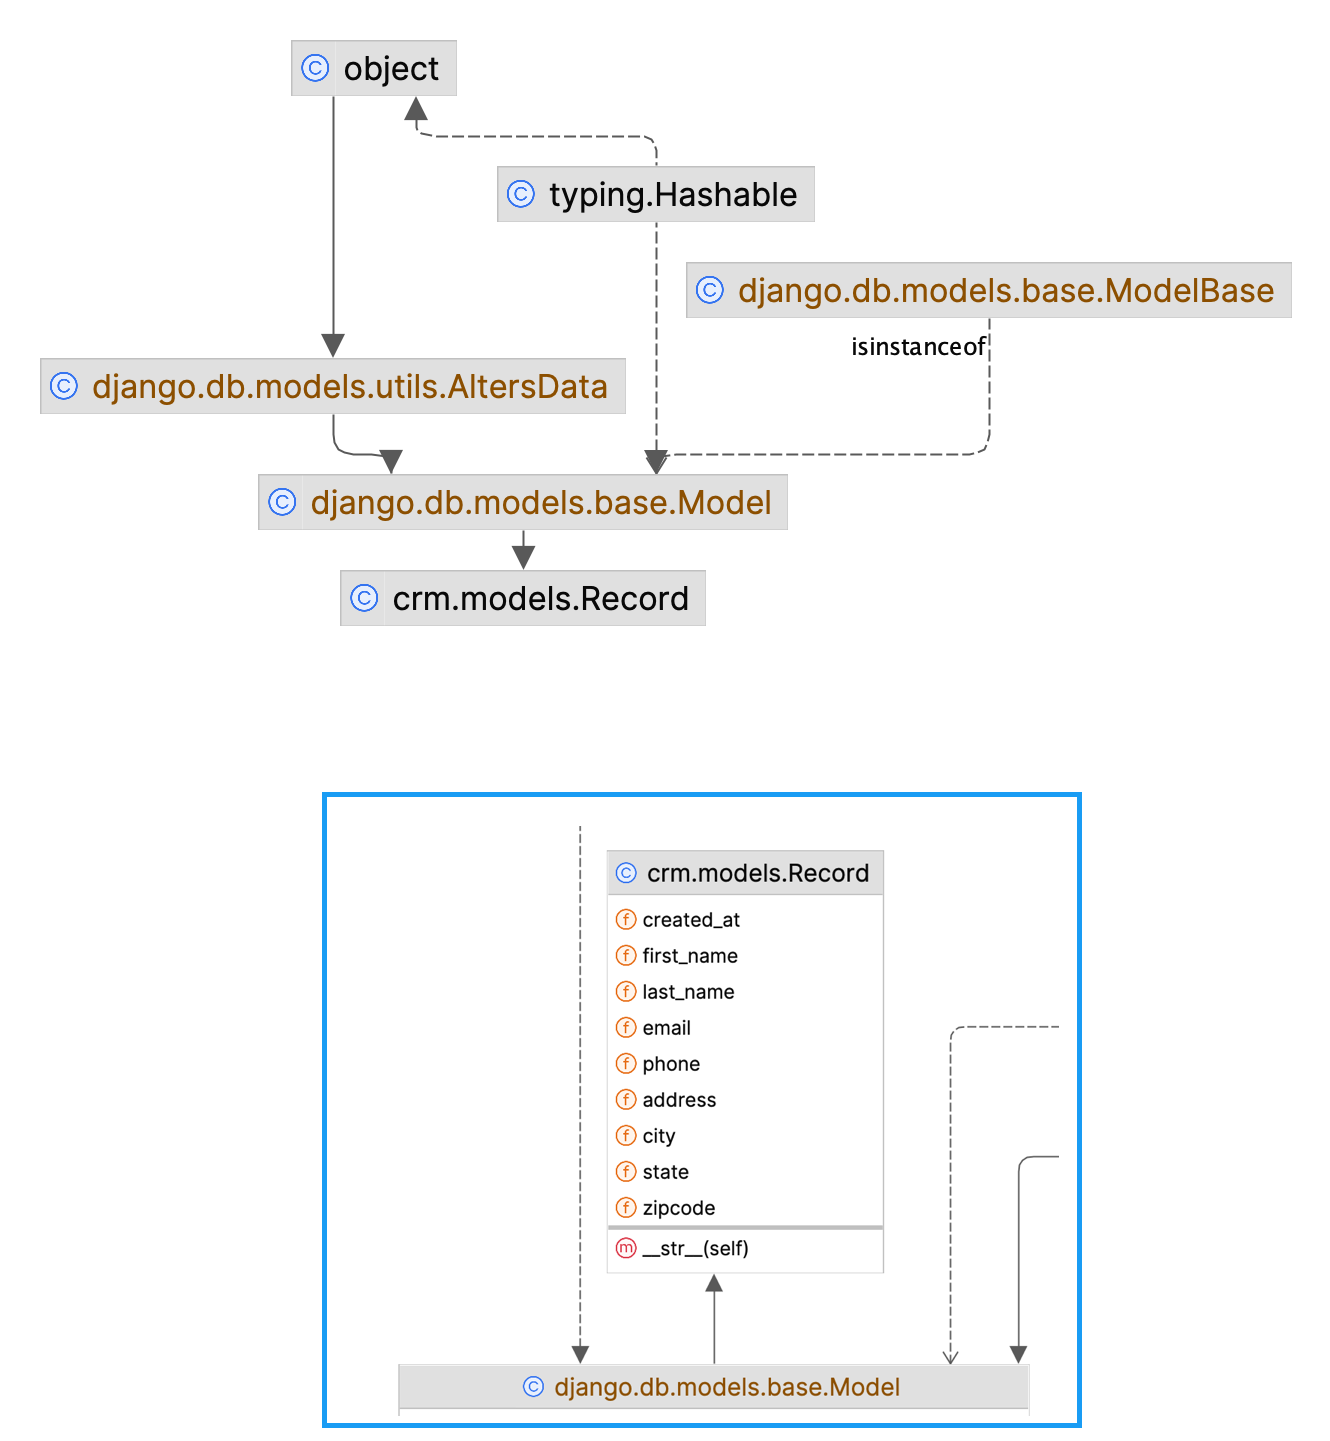
4.6.2.2 Update your database:
python manage.py makemigrations
python manage.py migratemakemigrations: Making shopping lists
This command generates migration files in the migrations directory of your app. These files contain the code needed to update the database schema.
migrate: Going shopping
This command applies the migrations to your database, making the necessary changes to the schema.
4.6.2.3 Explore Record in Admin UI
Update admin.py:
from django.contrib import admin
from .models import Record

admin.site.register(Record)
Note
We need to name the model Record, not Records, otherwise you will see Recordss in Admin UI.
4.6.2.4 Enter Data in Django Admin UI
Interview three friends and enter their data into the database using Admin UI.
4.6.3 Working with Models in Admin
Now you can use the Record model as Records:
Database Representation
- When you define a model in Django, it translates into a table in the database where each instance of the model represents a row in that table.
- The model’s fields correspond to the columns in the database table.
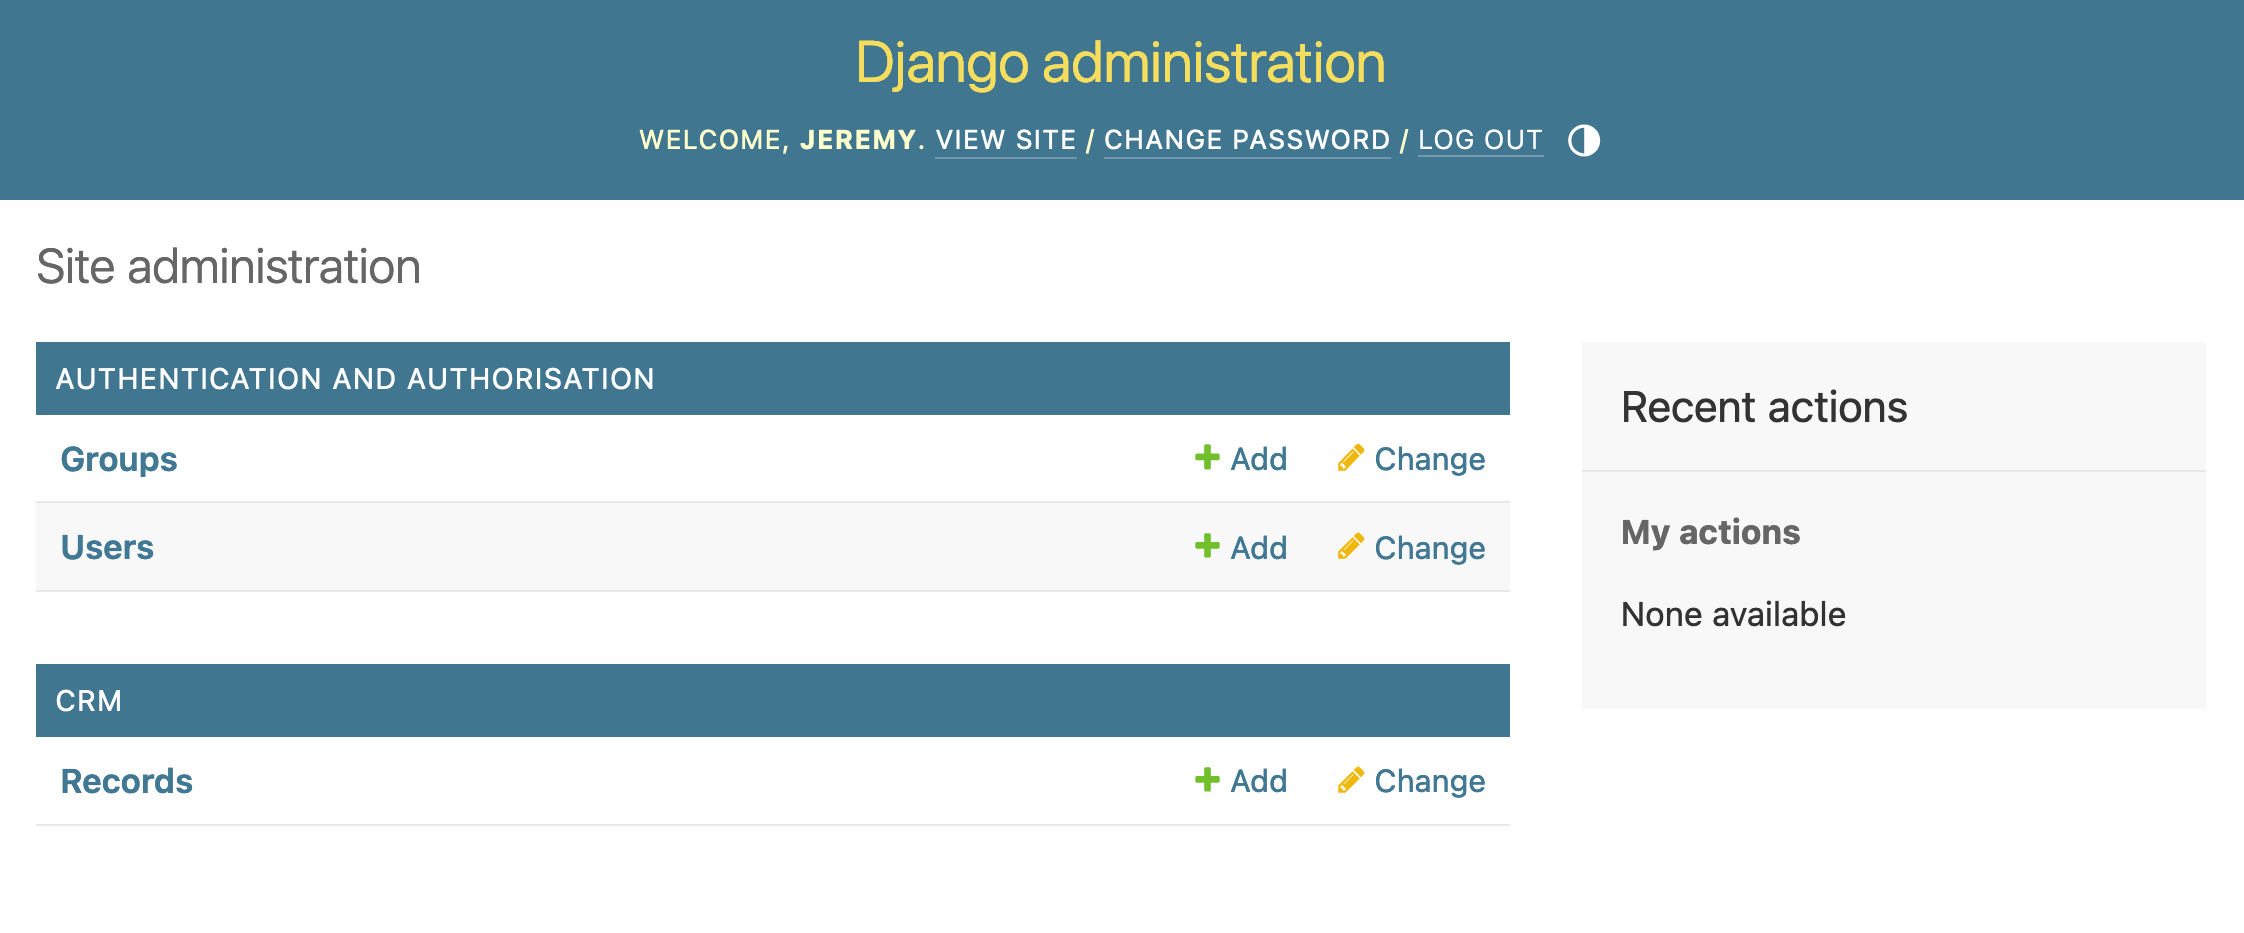
Let’s add some data into Records model: 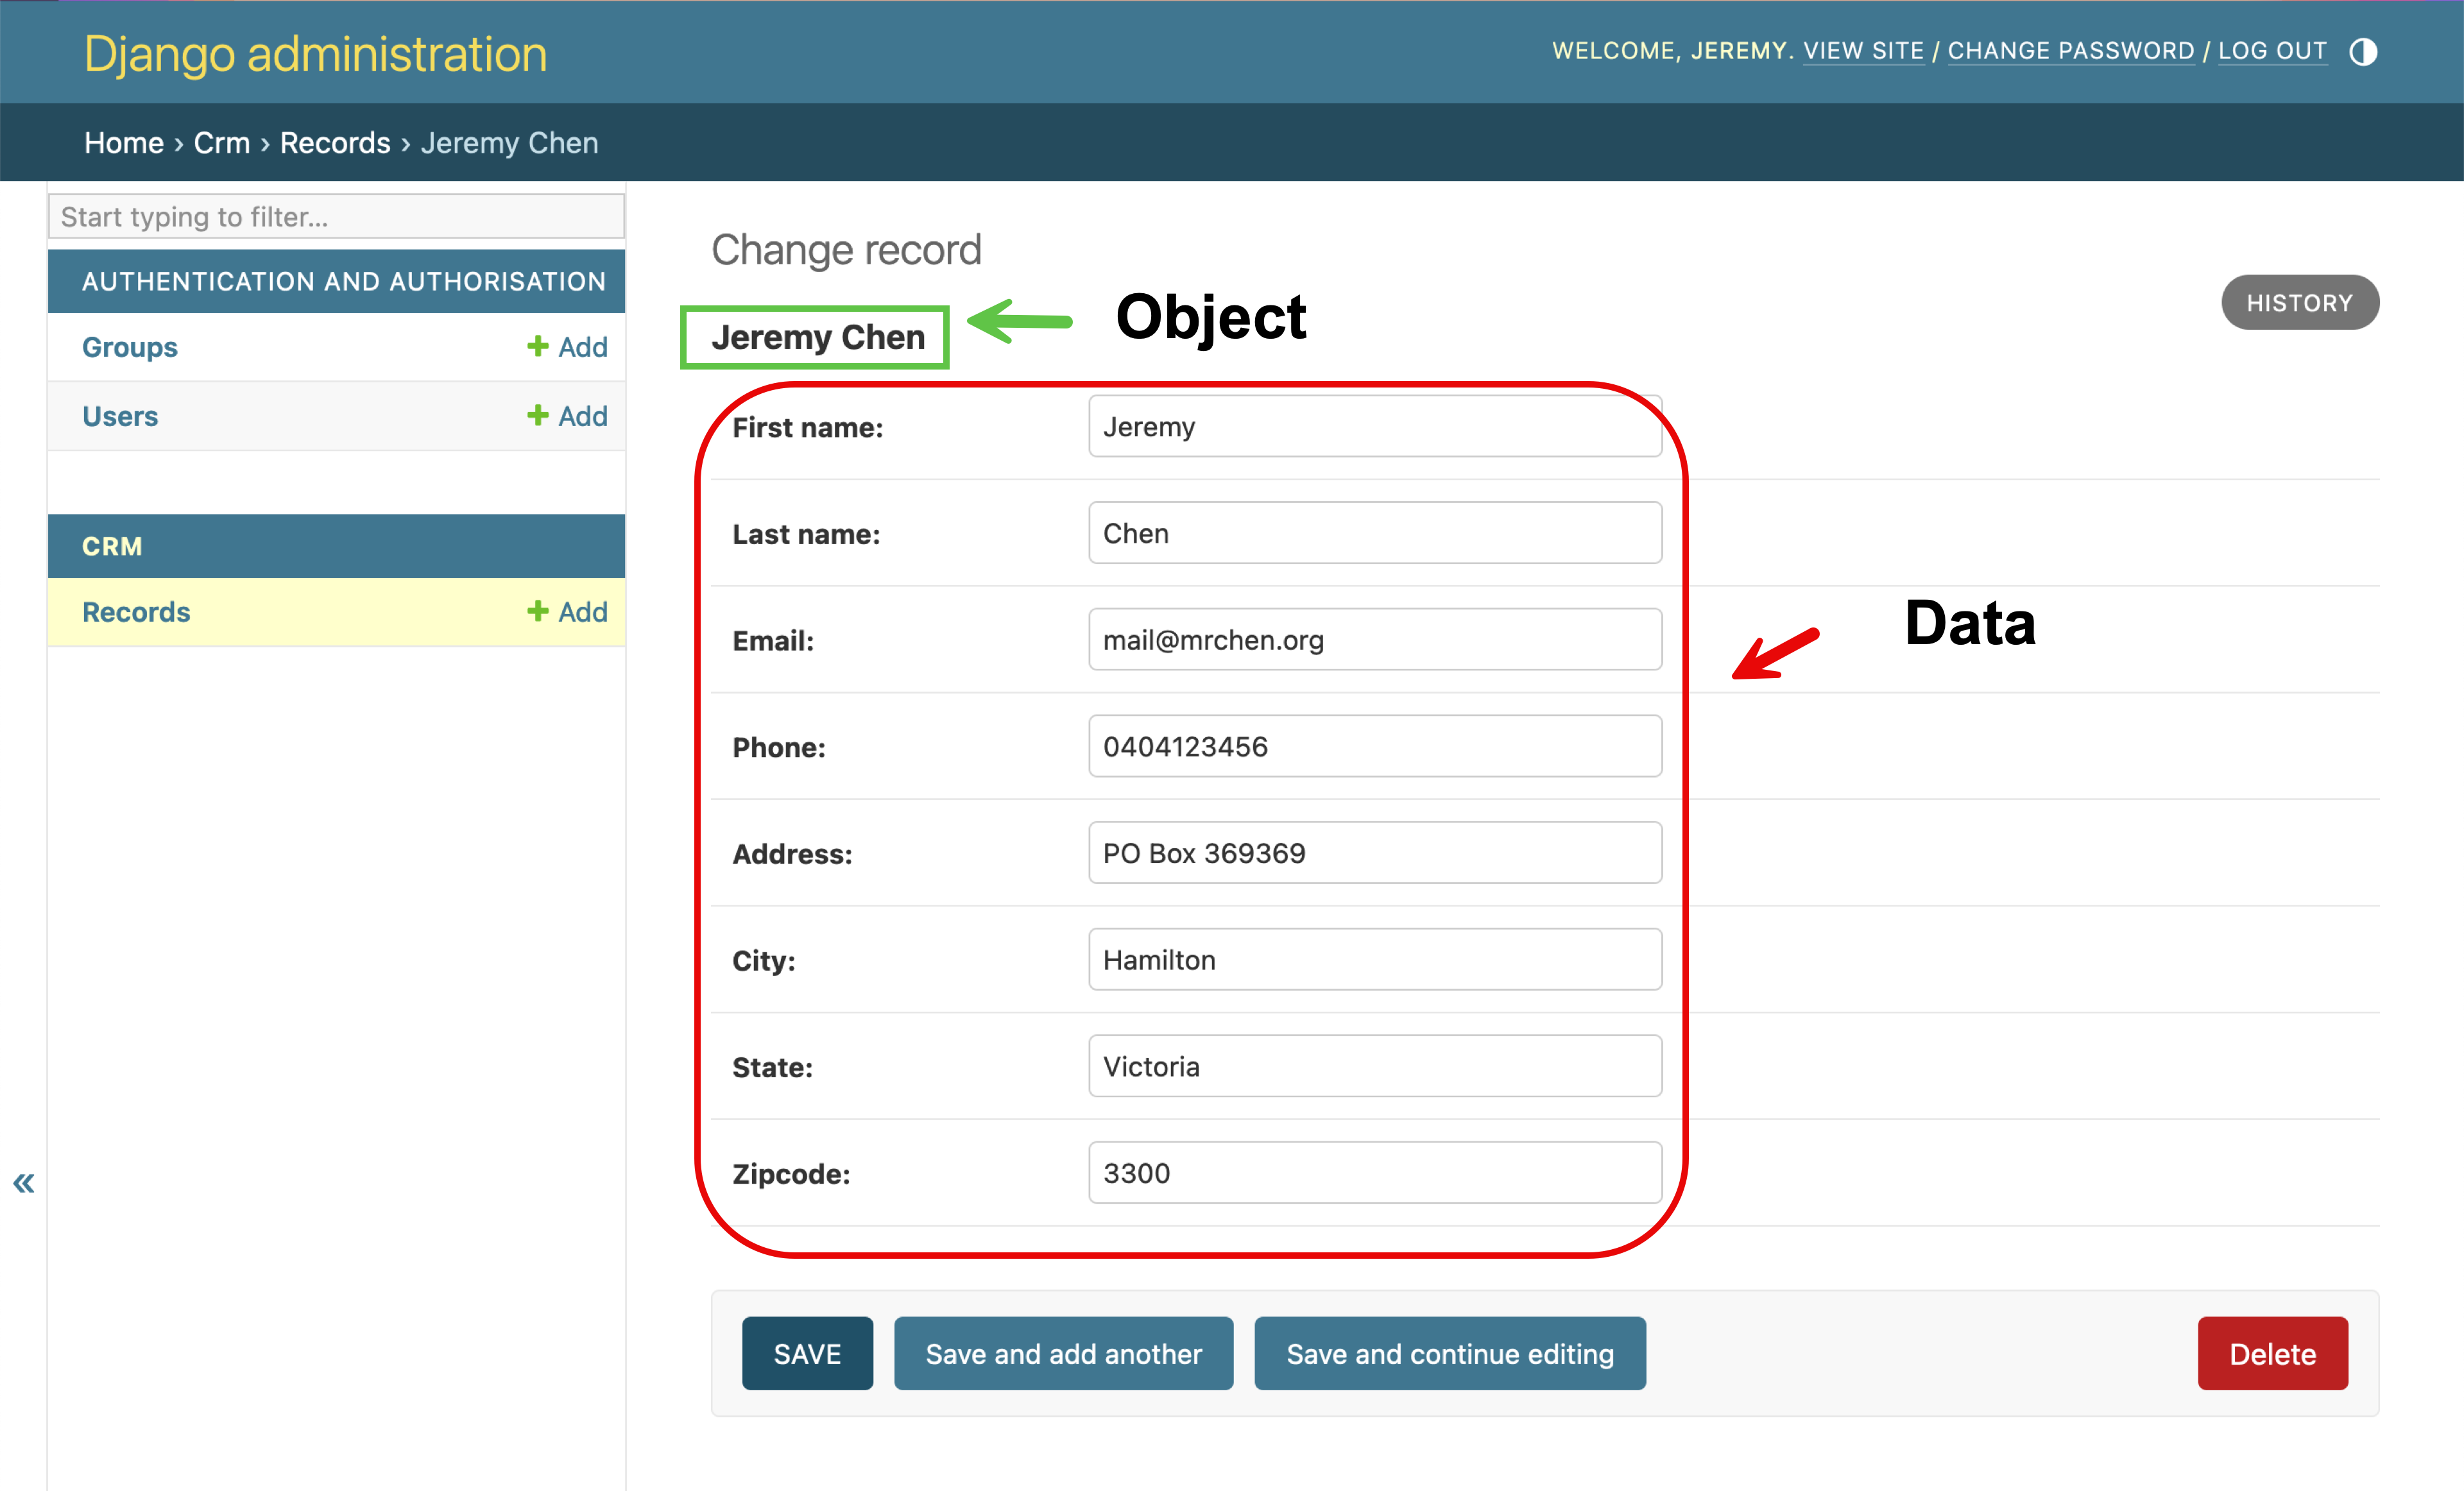
We can checkout the database used by Django:
4.7 MVP - Model: Concept
4.7.1 Model and Database
In Django, models are Python classes that define the structure of your database tables. They represent the data and the logic that surrounds the data. Each model maps to a single table in the database, and the attributes of the model class correspond to the fields in the table.
4.7.1.1 Define Model
A Django model is defined as a class that inherits from django.db.models.Model. Each attribute of the model represents a database field.
Here, the Book model represents a table in the database with fields like title, author, published_date, and isbn.
Models of Question, Choice and Quiz
from django.db import models

class Question(models.Model):
    class Difficulty(models.TextChoices):
        EASY = "E", "Easy"
        MEDIUM = "M", "Medium"
        HARD = "H", "Hard"

    text = models.CharField('question', max_length=255)
    details = models.TextField(blank=True)
    difficulty = models.CharField(
        max_length=1,
        choices=Difficulty.choices,
        blank=True,
        default=Difficulty.MEDIUM,
    )
    created_at = models.DateTimeField(auto_now_add=True)

    def __str__(self):
        return f"Question: {self.text}"


class Choice(models.Model):
    question = models.ForeignKey(
        Question,
        on_delete=models.CASCADE,
        related_name="choices"
    )
    text = models.TextField('choice')
    is_correct = models.BooleanField(default=False)
    details = models.TextField(blank=True)

    def __str__(self):
        return f"Choice: {self.text}"


class Quiz(models.Model):
    title = models.CharField(max_length=200)
    description = models.TextField(blank=True)
    questions = models.ManyToManyField(
        Question,
        related_name="quizzes",
    )
    max_questions = models.PositiveIntegerField(default=10)

    def __str__(self):
        return f"Quiz: {self.title}"

    class Meta:
        verbose_name_plural = "Quizzes"  # ensures Admin UI displays the plural name correctly

    def get_questions(self):
        return self.questions.all()

    def add_question(self, question):
        if self.questions.count() >= self.max_questions:
            raise ValueError(f"Cannot add more than {self.max_questions} questions to this quiz.")
        self.questions.add(question)
Let’s say if you want to find all the quizzess that include a question. You need related_name:
question = Question.objects.get(id=1)
associated_quizzes = question.quizzes.all()
Model of ReportCard:
from django.db import models
from django.contrib.auth.models import User

class ReportCard(models.Model):
    user = models.ForeignKey(User, on_delete=models.CASCADE, related_name="report_cards")
    quiz = models.ForeignKey(Quiz, on_delete=models.CASCADE, related_name="report_cards")
    score_percentage = models.FloatField()
    letter_grade = models.CharField(max_length=2, blank=True)

    def save(self, *args, **kwargs):
        self.letter_grade = self.calculate_letter_grade()
        super().save(*args, **kwargs)

    def calculate_letter_grade(self):
        if self.score_percentage >= 90:
            return 'A+'
        elif self.score_percentage >= 80:
            return 'A'
        elif self.score_percentage >= 70:
            return 'B'
        elif self.score_percentage >= 60:
            return 'C'
        elif self.score_percentage >= 50:
            return 'D'
        elif self.score_percentage >= 40:
            return 'E'
        else:
            return 'F'

    def __str__(self):
        return f"{self.user.username} - {self.quiz.title}: {self.letter_grade}"
4.7.2 Using Models for CRUD
4.7.2.1 Creating Records
This creates a new entry in the Question or Choice table.
You can create new records (rows) in the database by instantiating a model and calling the save() method.
# Creating a new Quiz record
new_quiz = Quiz(title="Django Basics", description="A quiz on the basic concepts of Django.")
new_quiz.save()

# Creating a new Question record and associating it with the Quiz
new_question = Question(text="Which command is used to start a new Django project?", difficulty=Question.Difficulty.MEDIUM)
new_question.save()

# Add the question to the quiz
new_quiz.questions.add(new_question)

# Creating a new Choice record associated with the above Question
new_choice1 = Choice(question=new_question, text="django-admin startapp", is_correct=False)
new_choice1.save()

new_choice2 = Choice(question=new_question, text="django-admin startproject", is_correct=True)
new_choice2.save()

new_choice3 = Choice(question=new_question, text="django-admin runserver", is_correct=False)
new_choice3.save()

new_choice4 = Choice(question=new_question, text="django-admin migrate", is_correct=False)
new_choice4.save()
4.7.2.2 Reading Records
Django provides a powerful ORM (Object-Relational Mapping) for querying the database. You can retrieve records using methods like all(), filter(), get(), and more.
# Retrieves all quizzes
all_quizzes = Quiz.objects.all()

# Retrieves a single question by its ID
specific_question = Question.objects.get(id=1)

# Retrieves all choices related to a specific question
choices_for_question = Choice.objects.filter(question=specific_question)

# Retrieves all questions in a specific quiz
questions_in_quiz = Quiz.objects.get(id=1).get_questions()
4.7.2.3 Updating Records
This changes the text of a question with the specified ID.
To update an existing record, retrieve the object, modify its attributes, and then call save().
question_to_update = Question.objects.get(id=1)
question_to_update.text = "What is the command to start a new Django project?"
question_to_update.save()
4.7.2.4 Deleting Records
This deletes the record from the Question table.
You can delete a record by calling the delete() method on a model instance.
question_to_delete = Question.objects.get(id=1)
question_to_delete.delete()
4.7.3 Using Queries
Django models also support complex queries, including joins, aggregations, and annotations, without writing raw SQL. The ORM handles the translation from Python code to SQL queries.
# Count all quizzes
quizzes_count = Quiz.objects.count()

# Get questions with a difficulty level of 'Easy'
easy_questions = Question.objects.filter(difficulty=Question.Difficulty.EASY)

# Get all choices for a specific question
choices_for_question = Choice.objects.filter(question_id=1)
4.7.4 Relational Database Relationships
In a relational database, relationships describe how tables are linked to one another. These connections allow us to organise and retrieve data efficiently. The most common types of database relationships are:
- One-to-One Relationship: One record in a table is linked to exactly one record in another table. For example, a ReportCard can be linked to exactly one User and one Quiz.
- One-to-Many Relationship: One record in a table can be linked to many records in another table. For example, each Question can have multiple Choices, but each Choice is associated with only one Question.
- Many-to-Many Relationship: Multiple records in one table can be linked to multiple records in another table. For example, each Quiz can contain multiple Questions, and each Question can belong to multiple Quizzes.
Django models can define relationships between tables using fields like ForeignKey, ManyToManyField, and OneToOneField.
# One to Many (One Question to Many Choices)
question = models.ForeignKey(Question, on_delete=models.CASCADE, related_name="choices")
# Many to Many (Many Quizzes to Many Questions)
questions = models.ManyToManyField(Question, related_name="quizzes")
# One to One (One Report Card to One User, One Report to One Quiz)
user = models.OneToOneField(User, on_delete=models.CASCADE, related_name="report_card")
quiz = models.OneToOneField(Quiz, on_delete=models.CASCADE, related_name="report_card")
4.7.5 Fields and Validation
4.7.5.1 Field Types
4.7.5.2 Common Field Types
| Field Type | Description |
|---|---|
| BooleanField | A true/false field. The default form widget for this field is a CheckboxInput. |
| CharField | A field to store text-based values. |
| DateField | A date, represented in Python by a datetime.date instance. |
| DateTimeField | A date and time, represented in Python by a datetime.datetime instance. |
| DecimalField | A fixed-precision decimal number, represented in Python by a Decimal instance. |
| EmailField | A CharField that checks the value is a valid email address. |
| FileField | A file-upload field. |
| FloatField | A floating-point number, represented in Python by a float instance. |
| ImageField | Inherits all attributes and methods from FileField, but also validates that the uploaded object is a valid image. |
| IntegerField | An integer, represented in Python by an int instance. |
| PositiveIntegerField | Like an IntegerField, but must be a positive integer. |
| TextField | A large text field. |
| URLField | A CharField that checks the value is a valid URL. |
| ForeignKey | A many-to-one relationship, linking to another model. |
| ManyToManyField | A many-to-many relationship, allowing multiple objects to be related. |
| TimeField | A time, represented in Python by a datetime.time instance. |
| UUIDField | A field for storing universally unique identifiers (UUID). |
| JSONField | A field for storing JSON-encoded data, allowing structured data storage. |
4.7.5.3 Field Arguments and Validation
- max_length: Specifies the maximum length of a string-based field.
- default: Sets a default value for the field.
- null: Allows the field to store NULL values in the database.
- blank: Determines whether the field is allowed to be blank (i.e., not filled out in forms).
- choices: Provides a set of choices for the field.
- help_text: Provides help text for the field, often used in forms.
- unique: Ensures that the field value is unique across the database table.
- verbose_name: A human-readable name for the field.
Example:
from django.db import models

class UserProfile(models.Model):
    username = models.CharField(max_length=30, unique=True, verbose_name="User Name")
    email = models.EmailField(unique=True, verbose_name="Email Address")
    age = models.IntegerField(null=True, blank=True, default=18)
    status = models.CharField(
        max_length=1,
        choices=[('A', 'Active'), ('I', 'Inactive')],
        default='A'
    )

    class Meta:
        verbose_name = "User Profile"
verbose_name_plural = "User Profiles"- max_length: Limits the length of username and status.
- default: Sets default values for age and status.
- null: Allows age to be NULL in the database.
- blank: Allows age to be empty in forms.
- choices: Provides options for status.
- unique: Ensures username and email are unique.
- verbose_name: Provides readable names for username and email.
Null v Blank
null=True: OK to have no data in the database.blank=True: OK to leave the form field empty."" (empty string)is a blank value.
4.7.5.4 Built-in Validators
from django.core.validators import MaxValueValidator, MinLengthValidator
from django.db import models

class MyModel(models.Model):
    age = models.IntegerField(validators=[MaxValueValidator(100)])
    name = models.CharField(max_length=100, validators=[MinLengthValidator(2)])
4.7.6 Custom Validators
from django.core.exceptions import ValidationError
from django.utils.translation import gettext_lazy as _

def validate_even(value):
    if value % 2 != 0:
        raise ValidationError(
            _('%(value)s is not an even number'),
            params={'value': value},
        )

class MyModel(models.Model):
    even_number = models.IntegerField(validators=[validate_even])
4.7.6.1 Validators for Forms
from django import forms
from django.core.validators import EmailValidator

class MyForm(forms.Form):
    email = forms.EmailField(validators=[EmailValidator(message="Enter a valid email address")])
4.7.7 Models and Database
4.7.7.1 Inspect the database
Look for crm_record
4.7.7.2 Inspect the SQL code
Under migrations folder, find 0001_initial.py:
# Generated by Django 5.0.7 on 2024-07-29 21:17

from django.db import migrations, models


class Migration(migrations.Migration):

    initial = True

    dependencies = [
    ]

    operations = [
        migrations.CreateModel(
            name='Record',
            fields=[
                ('id', models.BigAutoField(auto_created=True, primary_key=True, serialize=False, verbose_name='ID')),
                ('created_at', models.DateTimeField(auto_now_add=True)),
                ('first_name', models.CharField(max_length=50)),
                ('last_name', models.CharField(max_length=50)),
                ('email', models.CharField(max_length=100)),
                ('phone', models.CharField(max_length=15)),
                ('address', models.CharField(max_length=100)),
                ('city', models.CharField(max_length=50)),
                ('state', models.CharField(max_length=50)),
                ('zipcode', models.CharField(max_length=20)),
            ],
        ),
    ]
The equivalent SQL code:
CREATE TABLE "Record" (
    "id" BIGINT PRIMARY KEY AUTO_INCREMENT,
    "created_at" TIMESTAMP DEFAULT CURRENT_TIMESTAMP,
    "first_name" VARCHAR(50) NOT NULL,
    "last_name" VARCHAR(50) NOT NULL,
    "email" VARCHAR(100) NOT NULL,
    "phone" VARCHAR(15) NOT NULL,
    "address" VARCHAR(100) NOT NULL,
    "city" VARCHAR(50) NOT NULL,
    "state" VARCHAR(50) NOT NULL,
    "zipcode" VARCHAR(20) NOT NULL
);
4.8 MVP - View: Record
We will create a view for the CRM called crm_views to perform the following functionalities in views.py under the crm app:
- Accept HTTP(S) requests from
urls.py. - Query and retrieve data from
models.py. - Render data using the
crm.htmltemplate.
So we also need to update urls.py and create crm.html.
4.8.1 Update URL routing to Record list page
crm/urls.py:
from django.urls import path
from . import views


urlpatterns = [
    path('', views.home, name='home'),
    path('records', views.record_list, name='record_list'),
]  # New
4.8.2 Add the View for Record
Update crm/views.py:
from django.shortcuts import render
from .models import Record # new
def home(request):
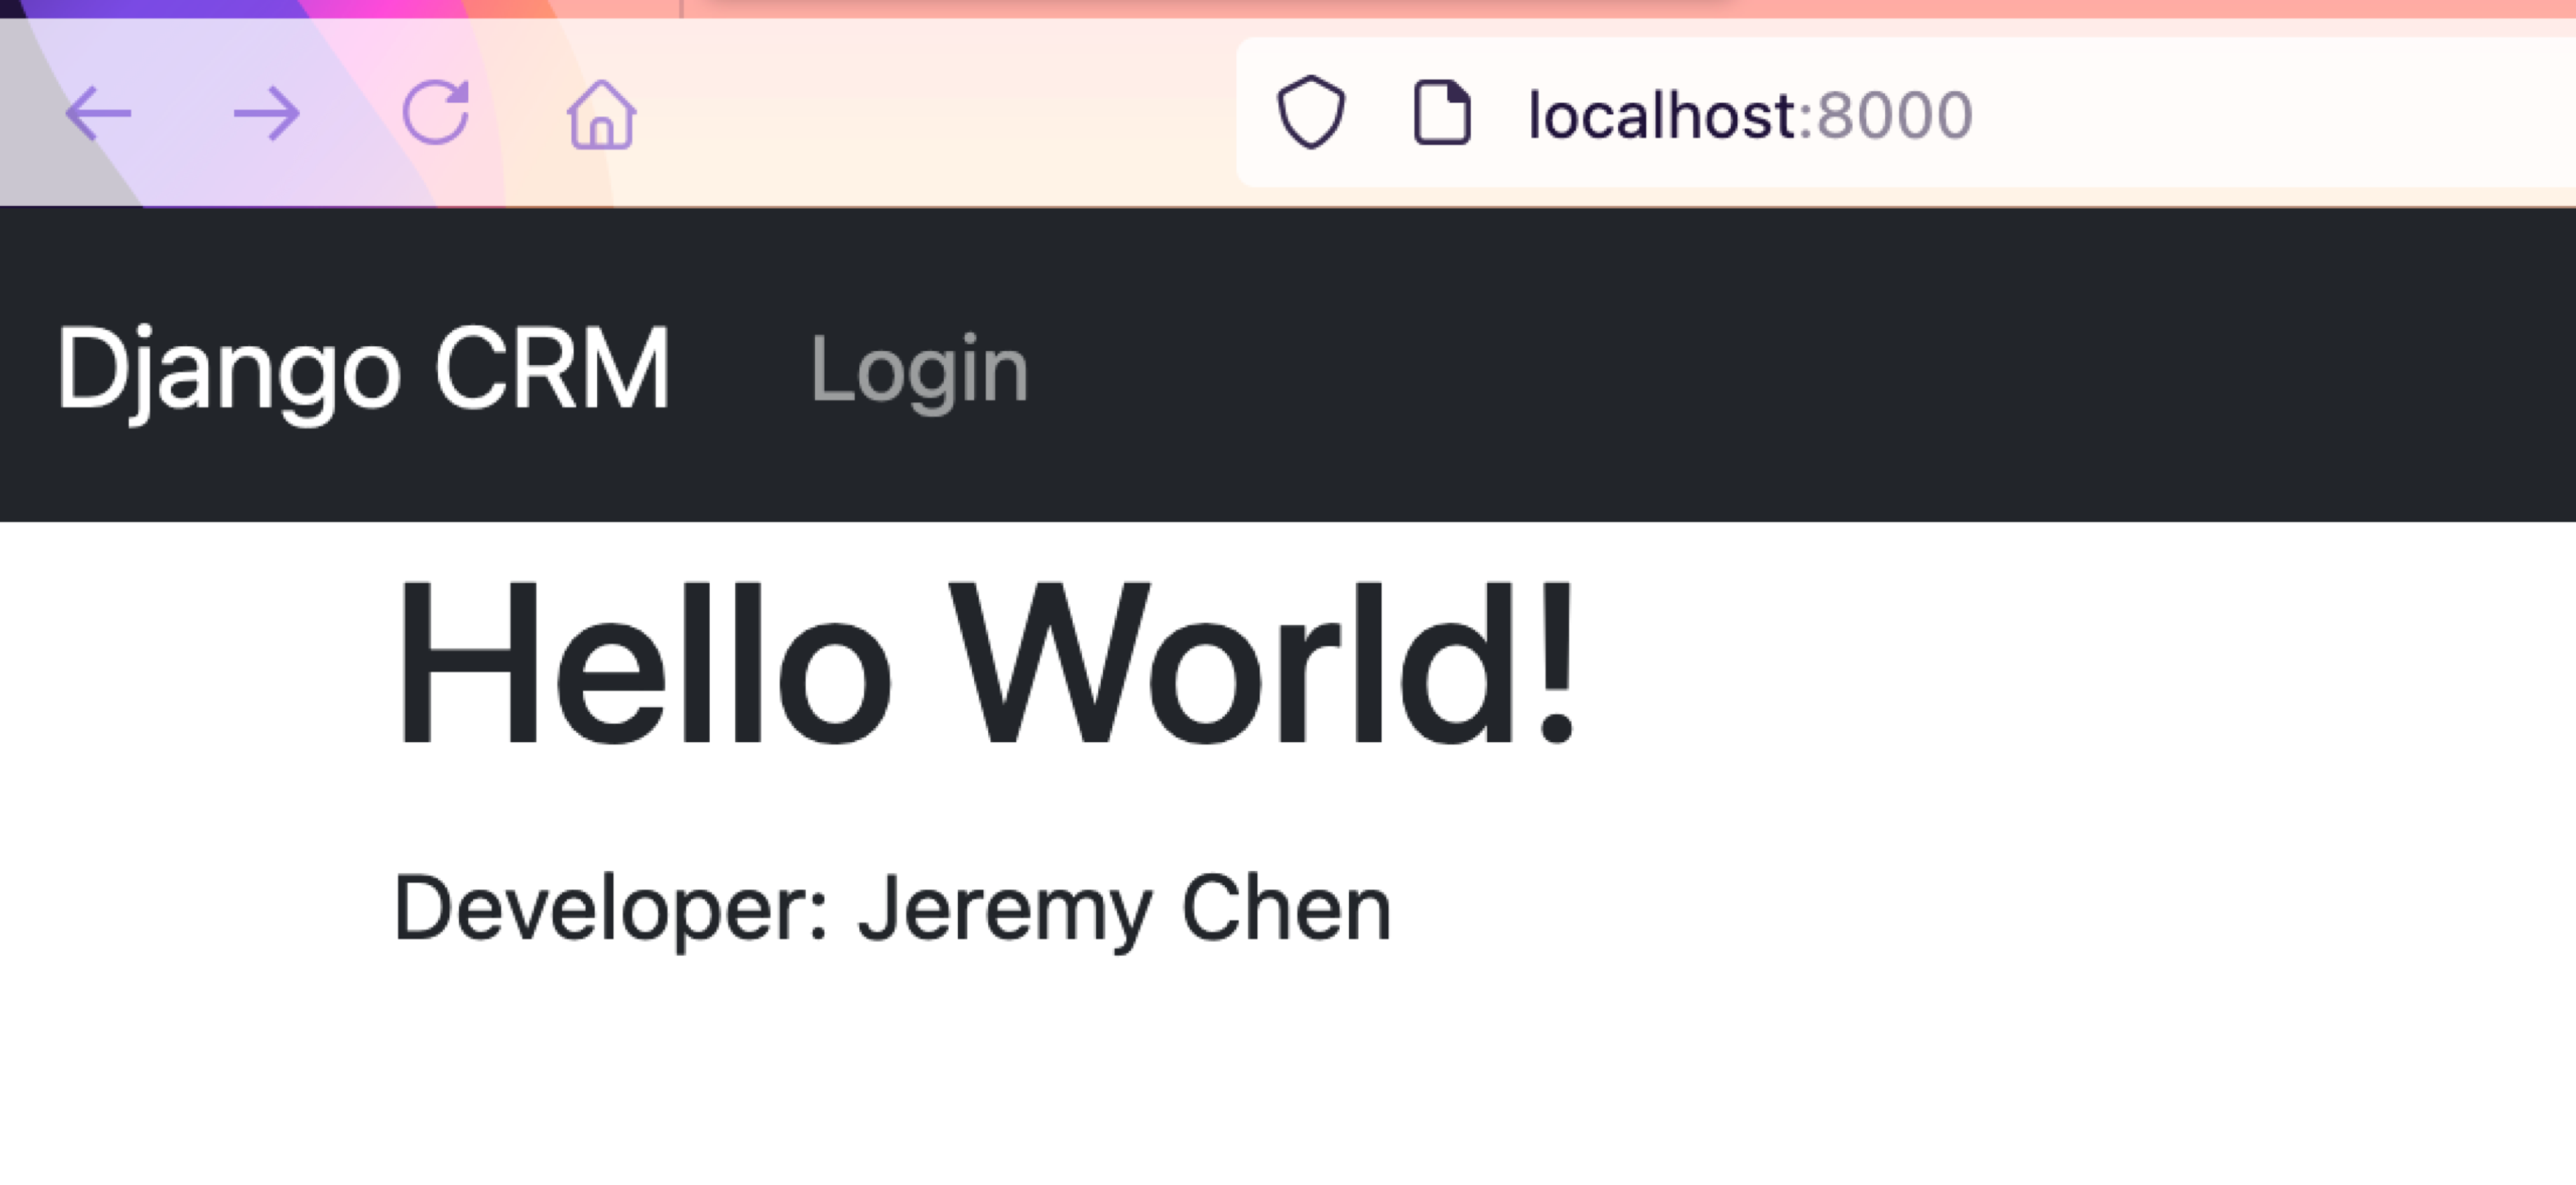
records = {"developer": "Jeremy Chen"}
return render(request, 'crm/home.html', {'records': records})
def record_list(request): # record list view
records = Record.objects.all()
return render(request, 'crm/record_list.html', {"records": records})4.8.3 Typical Flow of a Django View:
- Receive a request: Understand what the user wants.
- Process data: Interact with the database to retrieve, filter, or manipulate data.
- Respond: Return an HTML response, constructed based on a template, filled with dynamic data.
4.8.4 Explanation of the crm_view Function
- Function Definition:
def record_list(request): This line defines a function namedrecord_listin Python, which is a view function in Django. The function takes one parameter,request, which contains information about the current web request that Django receives from a user.
- Querying the Database:
records = Record.objects.all(): This line retrieves all entries from theRecordmodel. TheRecordmodel represents a table in your database, andRecord.objects.all()is a query that asks for all records in that table, returning them as a queryset. A queryset is a Django concept that represents a collection of database queries to retrieve objects from your database.
- Rendering the Template:
return render(request, 'crm/crm.html', {"records": records}): This line is responsible for generating the HTML response that the user will see in their browser.request: The original HTTP request is passed to therenderfunction so that Django can maintain the state throughout the lifecycle of the request.'crm/crm.html': This string specifies the path to the template filecrm.htmllocated inside acrmdirectory. This template will be used to build the HTML content of the response.{"records": records}: This dictionary is the context data passed to the template. It contains the data retrieved from the database (records), labeled as “records”. This label is what you’ll use in the template to access the data.
4.8.5 Real Life Example
Let’s imagine we have a CRM for library books:
- Think of the function
record_listas a librarian. When the user (as the visitor) ask to see all available books, that’s like sending a request to the librarian. - The librarian then checks the library catalog, similar to how our function uses
Record.objects.all()to gather all records from the database. - After finding the books, the librarian prepares a list and shows it to you. In our case, the
record_listfunction takes all the records it gathered and displays them on the webpagecrm/record_list.html, making sure you can easily read and understand the information presented.
4.9 MVP - Template: Record
4.9.1 The CRM template
record_list.html
{% extends 'base.html' %}

{% block content %}
    <table class="table table-striped table-hover table-bordered">
        <thead class="table-dark">
        <tr>
            <th scope="col">Name</th>
            <th scope="col">Email</th>
            <th scope="col">Phone</th>
            <th scope="col">Address</th>
            <th scope="col">City</th>
            <th scope="col">State</th>
            <th scope="col">Zipcode</th>
            <th scope="col">Created At</th>
            <th scope="col">ID</th>
        </tr>
        </thead>
        <tbody>
        {% if records %}
            {% for record in records %}
                <tr>
                    <td>{{ record.first_name }} {{ record.last_name }}</td>
                    <td>{{ record.email }}</td>
                    <td>{{ record.phone }}</td>
                    <td>{{ record.address }}</td>
                    <td>{{ record.city }}</td>
                    <td>{{ record.state }}</td>
                    <td>{{ record.zipcode }}</td>
                    <td>{{ record.created_at }}</td>
                    <td>{{ record.id }}</td>
                </tr>
            {% endfor %}
        {% else %}
            <tr>
                <td colspan="9">No records found.</td>
            </tr>
        {% endif %}
        </tbody>
    </table>
{% endblock %}
4.9.2 Django Template Language
- Template Inheritance:
- Syntax:
{% extends 'base.html' %} - Explanation: This line indicates that the template extends another template called
base.html. Template inheritance allows you to build a base structure that other templates can inherit, promoting reuse and consistency.
- Syntax:
- Block Tags:
- Syntax:
{% block content %} ... {% endblock %} - Explanation: Block tags define sections of the template that child templates can override. In this case, the
contentblock is where specific content for this page is placed.
- Syntax:
- Conditional and Loop Tags:
Control structure:
{% if records %}
    {% for record in records %}
       ...
    {% endfor %}
{% else %}
   ...
{% endif %}
Syntax Explanation:
{% if records %}: Checks if therecordslist is not empty.{% for record in records %}: Iterates over each item in therecordslist, allowing you to generate a table row for each record.{% else %}: Provides an alternative block to execute ifrecordsis empty.
- Variable Tags:
- Syntax:
{{ record.first_name }} - Explanation: Double curly braces are used to output variables from the context. Here,
record.first_nameaccesses thefirst_nameattribute of therecordobject.
- Syntax:
4.9.3 Bootstrap
- Table Classes:
- Syntax:
<table class="table table-striped table-hover table-bordered"> - Explanation: These classes apply Bootstrap’s styling to the table:
table: Base class for a Bootstrap table.table-striped: Adds zebra-striping to the table rows.table-hover: Highlights rows on hover.table-bordered: Adds borders to the table and its cells.
- Syntax:
- Table Head and Dark Theme:
- Syntax:
<thead class="table-dark"> - Explanation: The
table-darkclass applies a dark background to the table header, enhancing the contrast and readability.
- Syntax:
- Column Scope:
- Syntax:
<th scope="col">Name</th> - Explanation: The
scope="col"attribute indicates that the header is for a column, helping screen readers to interpret the table structure.
- Syntax:
4.9.4 Display of Record List Page
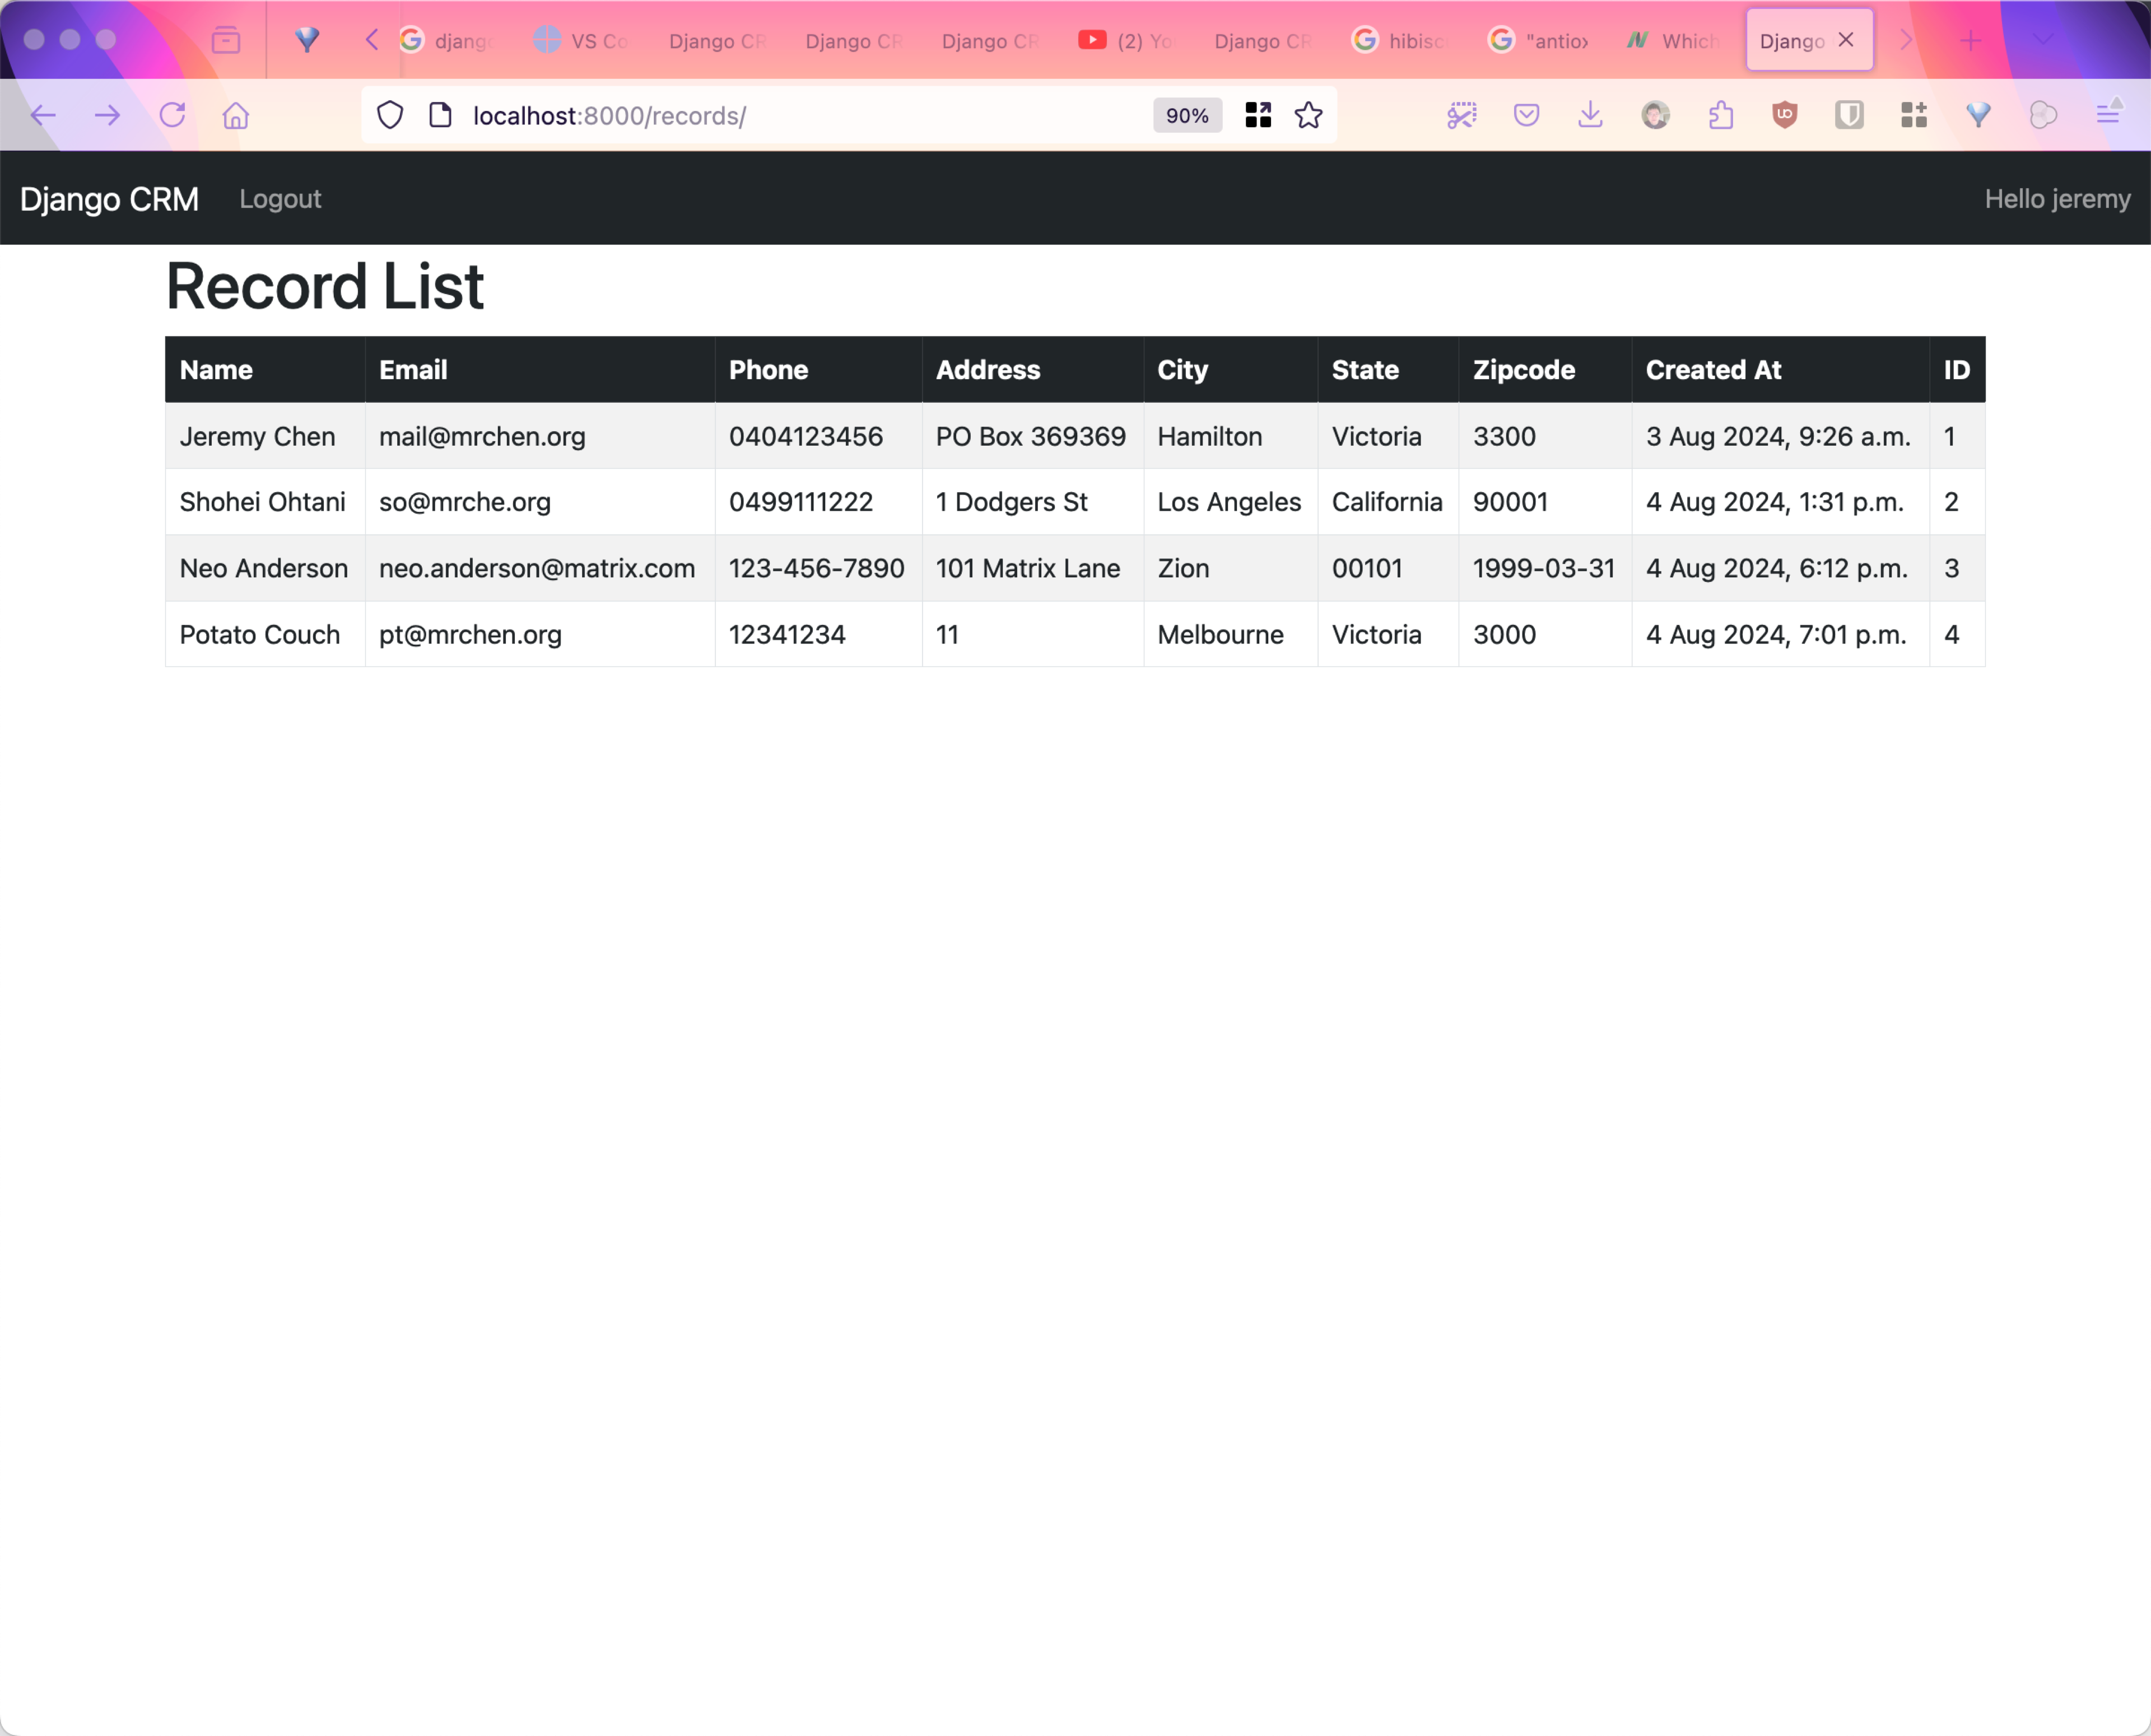
4.10 MVP - Record List View Update
```{html filename=“record_list.html”}
{% extends ‘base.html’ %}
{% block content %}Record List
<table class="table table-striped table-hover table-bordered">
    <thead class="table-dark">
    <tr>
        <th scope="col">Name</th>
        <th scope="col">City</th>
        <th scope="col">State</th>
        <th scope="col">ID</th>
    </tr>
    </thead>
    <tbody>
    {% if records %}
        {% for record in records %}
            <tr>
                <td>{{ record.first_name }} {{ record.last_name }}</td>
                <td>{{ record.city }}</td>
                <td>{{ record.state }}</td>
                <td><a href="{% url 'record_detail' record.pk %}">{{ record.id }}</a></td>
            </tr>
        {% endfor %}
    {% else %}
        <tr>
            <td colspan="9">No records found.</td>
        </tr>
    {% endif %}
    </tbody>
</table>
<div class="mb-3">
    <a href="{% url 'record_create' %}" class="btn btn-warning">Create New Record</a>
</div>
{% endblock %}
## MVP - CRUD

This is not the right video.


### What is CRUD?

CRUD stands for Create, Read, Update, and Delete, which are the four basic operations for managing data in a database.

In a web application like Django, these operations allow users to interact with the data:

- **Create** lets users add new records, such as entering a new book into the library system;
- **Read** allows users to view existing records, which can be done through list views that show all entries or detail views that display information about a specific entry;
- **Update** enables users to modify existing records, such as correcting an author’s name; and
- **Delete** permits users to remove records from the database, like deleting a book that is no longer available.

These operations form the foundation of most web applications, providing a consistent framework for data manipulation and user interaction.

### Common Paths, Views, Template, URL Name and CRUD

| **URL Path**               | **View Type**  | **View Function** | **Template**                  | **URL Name**          | **CRUD Operation** |
|----------------------------|----------------|-------------------|-------------------------------|-----------------------|--------------------|
| `records/`                 | List View      | `record_list`     | `record_list.html`            | `name='record_list'`  | Read               |
| `records/<int:pk>/`        | Detail View    | `record_detail`   | `record_detail.html`          | `name='record_detail'`| Read               |
| `records/create/`          | Create View    | `record_create`   | `record_form.html`            | `name='record_create'`| Create             |
| `records/<int:pk>/update/` | Update View    | `record_update`   | `record_form.html`            | `name='record_update'`| Update             |
| `records/<int:pk>/delete/` | Delete View    | `record_delete`   | `record_confirm_delete.html`  | `name='record_delete'`| Delete             |


### Build Detail View

We have implemented the list view. Now let's complete the detail view. It needs to use the primary key **pk**.

#### URL Path for Detail View

`urls.py`

```python
from django.urls import path
from . import views


urlpatterns = [
    path('', views.home, name='home'),
    path('records/', views.record_list, name='record_view'),
    path('records/<int:pk>/', views.record_detail, name='record_detail'),
]
4.10.0.1 Record Detail View
def record_detail(request, pk):
    record = get_object_or_404(Record, pk=pk)
    return render(request, 'crm/record_detail.html', {'record': record})
Sinle record is used, not multiple records
When looking at the details, only one record is displayed.
4.10.0.2 Record Detail Template
record_detail.html
{% extends 'base.html' %}
{% block content %}
<h1>Record Details</h1>
<table class="table table-striped table-hover table-bordered">
<thead class="table-dark">
<tr>
<th scope="col">Field</th>
<th scope="col">Value</th>
</tr>
</thead>
<tbody>
<tr>
<th>Name</th>
<td>{{ record.first_name }} {{ record.last_name }}</td>
</tr>
<tr>
<th>Email</th>
<td>{{ record.email }}</td>
</tr>
<tr>
<th>Phone</th>
<td>{{ record.phone }}</td>
</tr>
<tr>
<th>Address</th>
<td>{{ record.address }}</td>
</tr>
<tr>
<th>City</th>
<td>{{ record.city }}</td>
</tr>
<tr>
<th>State</th>
<td>{{ record.state }}</td>
</tr>
<tr>
<th>Zipcode</th>
<td>{{ record.zipcode }}</td>
</tr>
<tr>
<th>Created At</th>
<td>{{ record.created_at }}</td>
</tr>
<tr>
<th>ID</th>
<td>{{ record.id }}</td>
</tr>
</tbody>
</table>
<a href="{% url 'record_list' %}" class="btn btn-primary">Back to List</a>
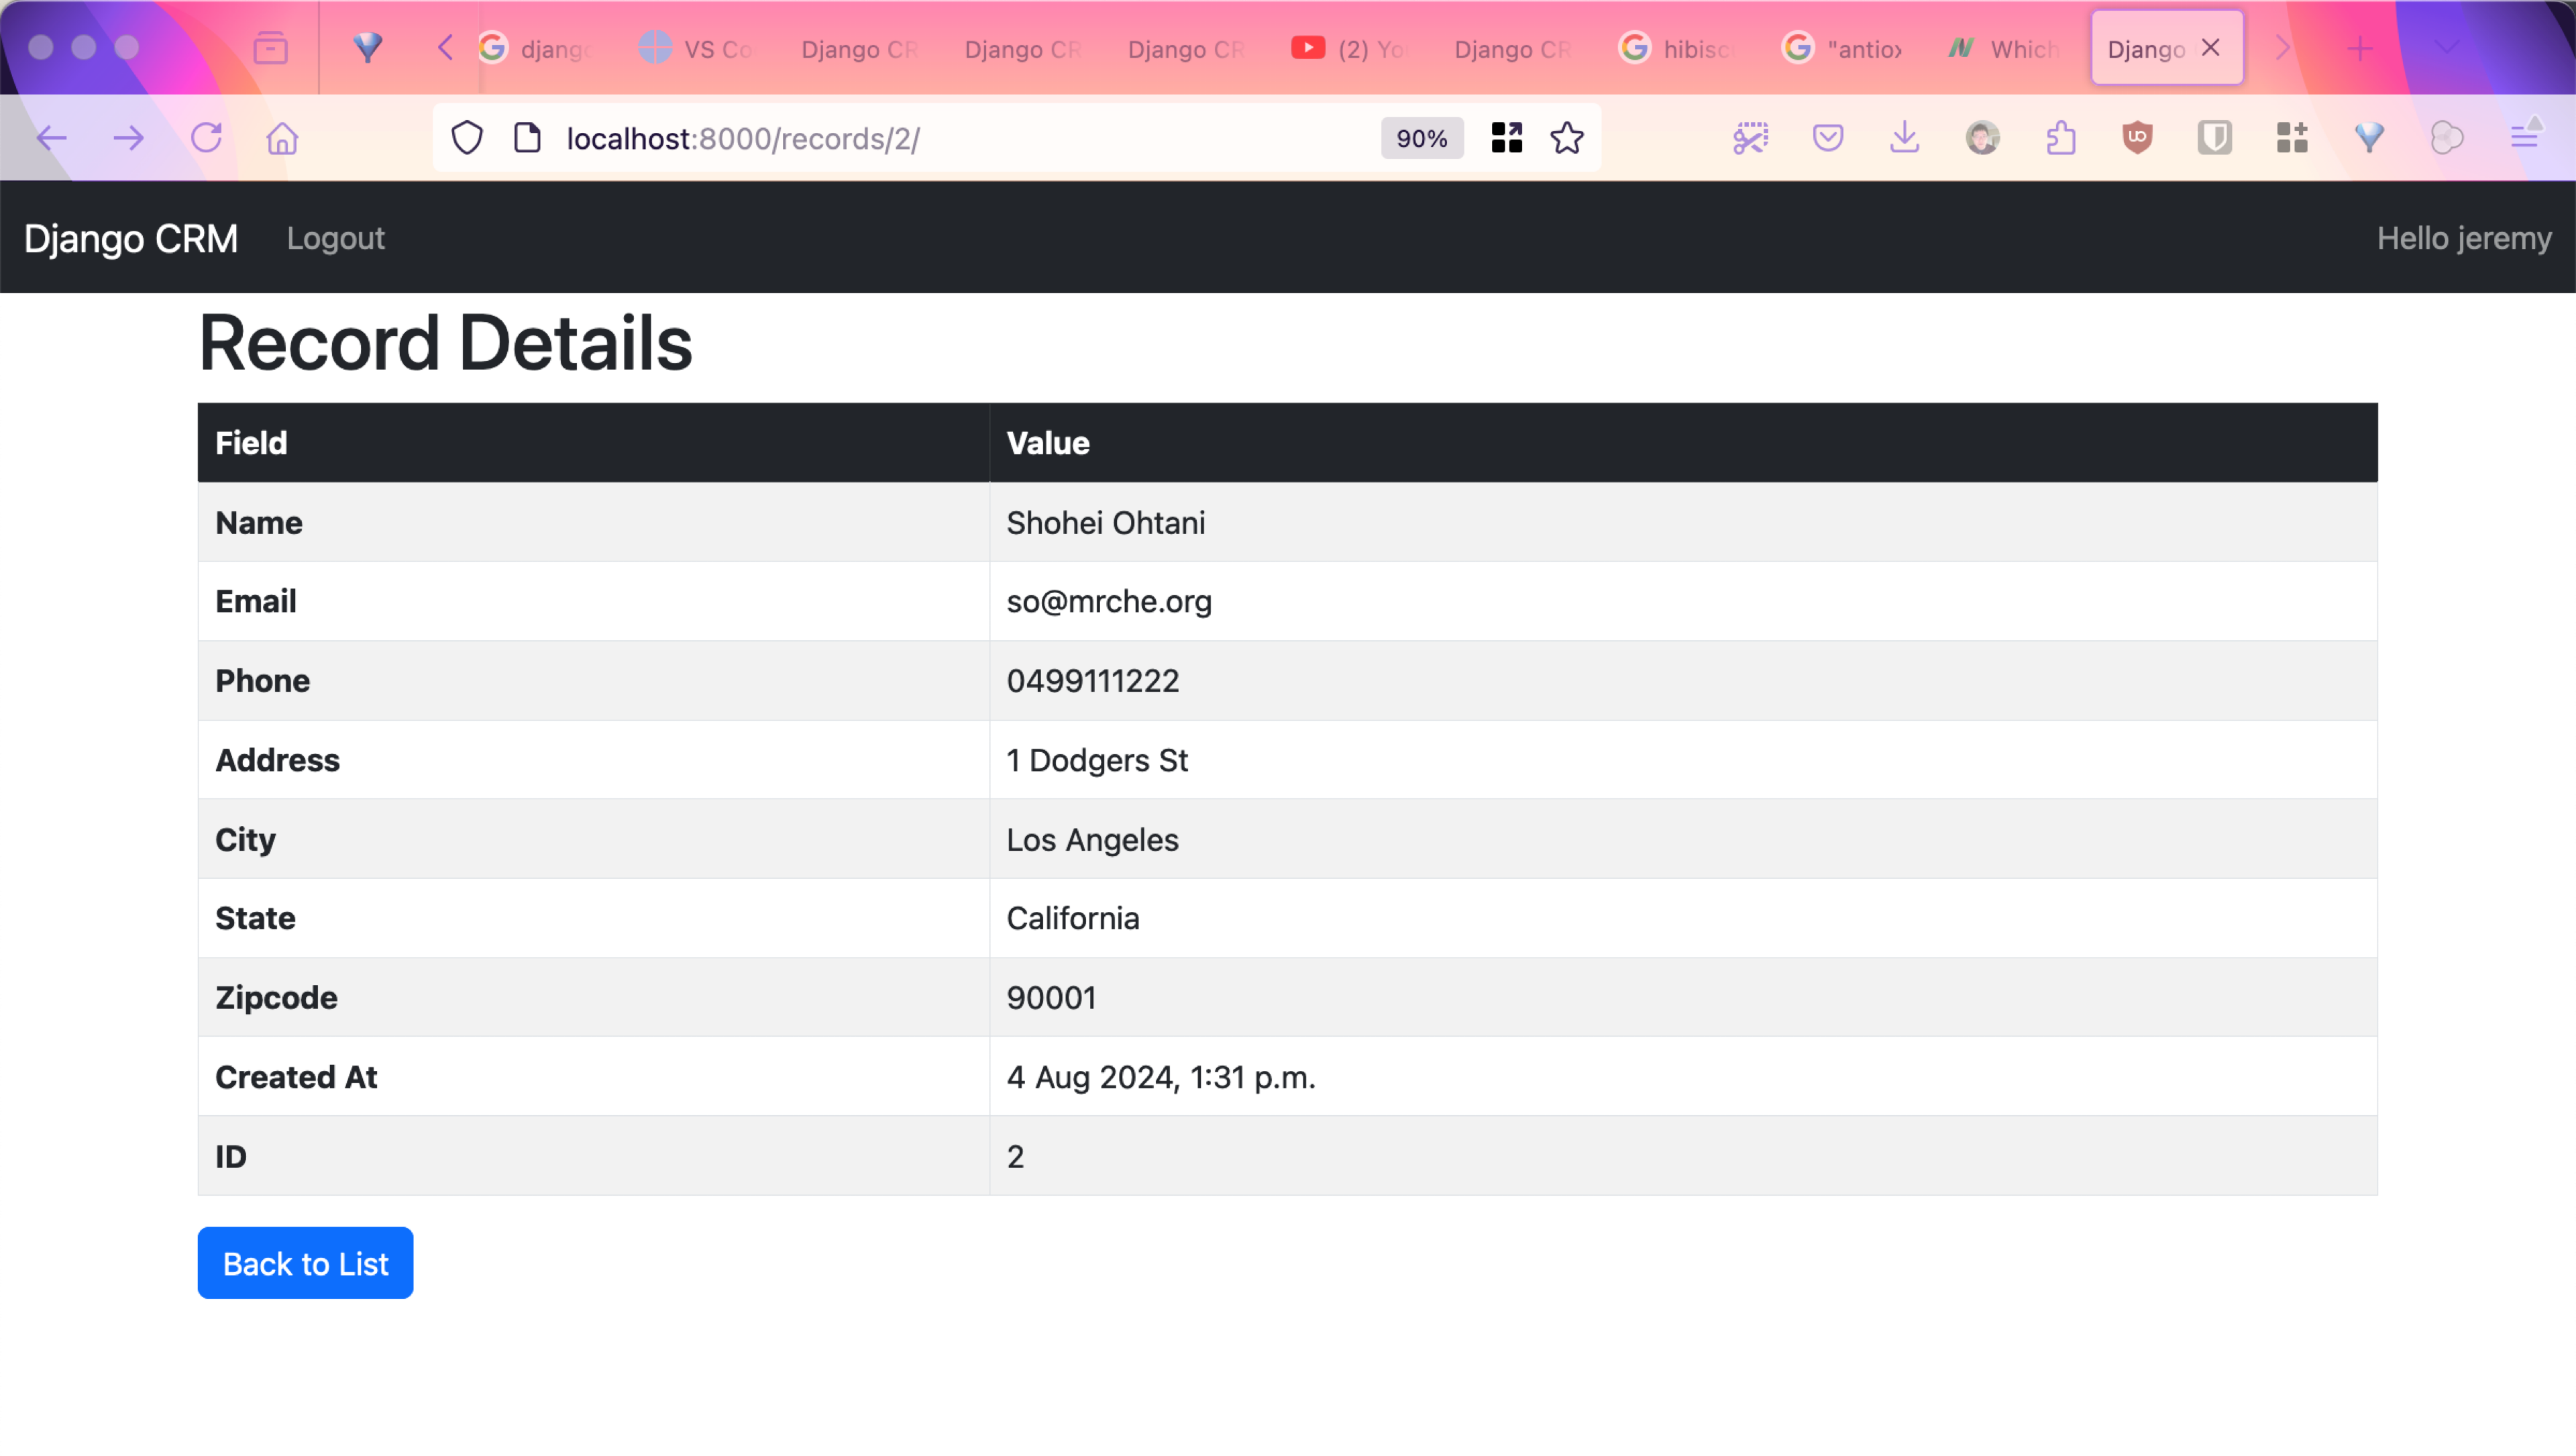
{% endblock %}4.10.0.3 Record Detail Page
4.10.1 Build Create View
When implementing the create view in Django, you’ll need an additional form class called RecordForm. This class should be defined in forms.py, not models.py. The RecordForm uses Django’s ModelForm to automatically generate form fields and handle validation based on the Record model. This approach helps ensure consistency between your form and model, making data entry and validation more efficient. Remember, keeping your forms and models in separate files maintains a clear separation of concerns, which is a key practice in Django development.
4.10.1.1 URL Path for Create View
urls.py
from django.urls import path
from . import views

urlpatterns = [
    path('', views.home, name='home'),
    path('records/', views.record_list, name='record_list'),
    path('records/<int:pk>/', views.record_detail, name='record_detail'),
    path('records/create/', views.record_create, name='record_create'),
]
4.10.1.2 Record Form
# forms.py

from django import forms
from .models import Record

class RecordForm(forms.ModelForm):
    class Meta:
        model = Record
        fields = ['first_name', 'last_name', 'email', 'phone', 'address', 'city', 'state', 'zipcode']
4.10.1.3 Record Create View
from django.shortcuts import render, get_object_or_404, redirect
from .models import Record
from .forms import RecordForm

# Existing code has been removed

def record_create(request):
    if request.method == "POST":
        form = RecordForm(request.POST)
        if form.is_valid():
            form.save()
            return redirect('record_list')  # Redirect to the list view after successful creation
    else:
        form = RecordForm()
    return render(request, 'crm/record_form.html', {'form': form})
4.10.1.4 Record Form Template
One template for two views
This template record_form.html is used for both the create view and the update view.
record_form.html
{% extends 'base.html' %}
{% block content %}
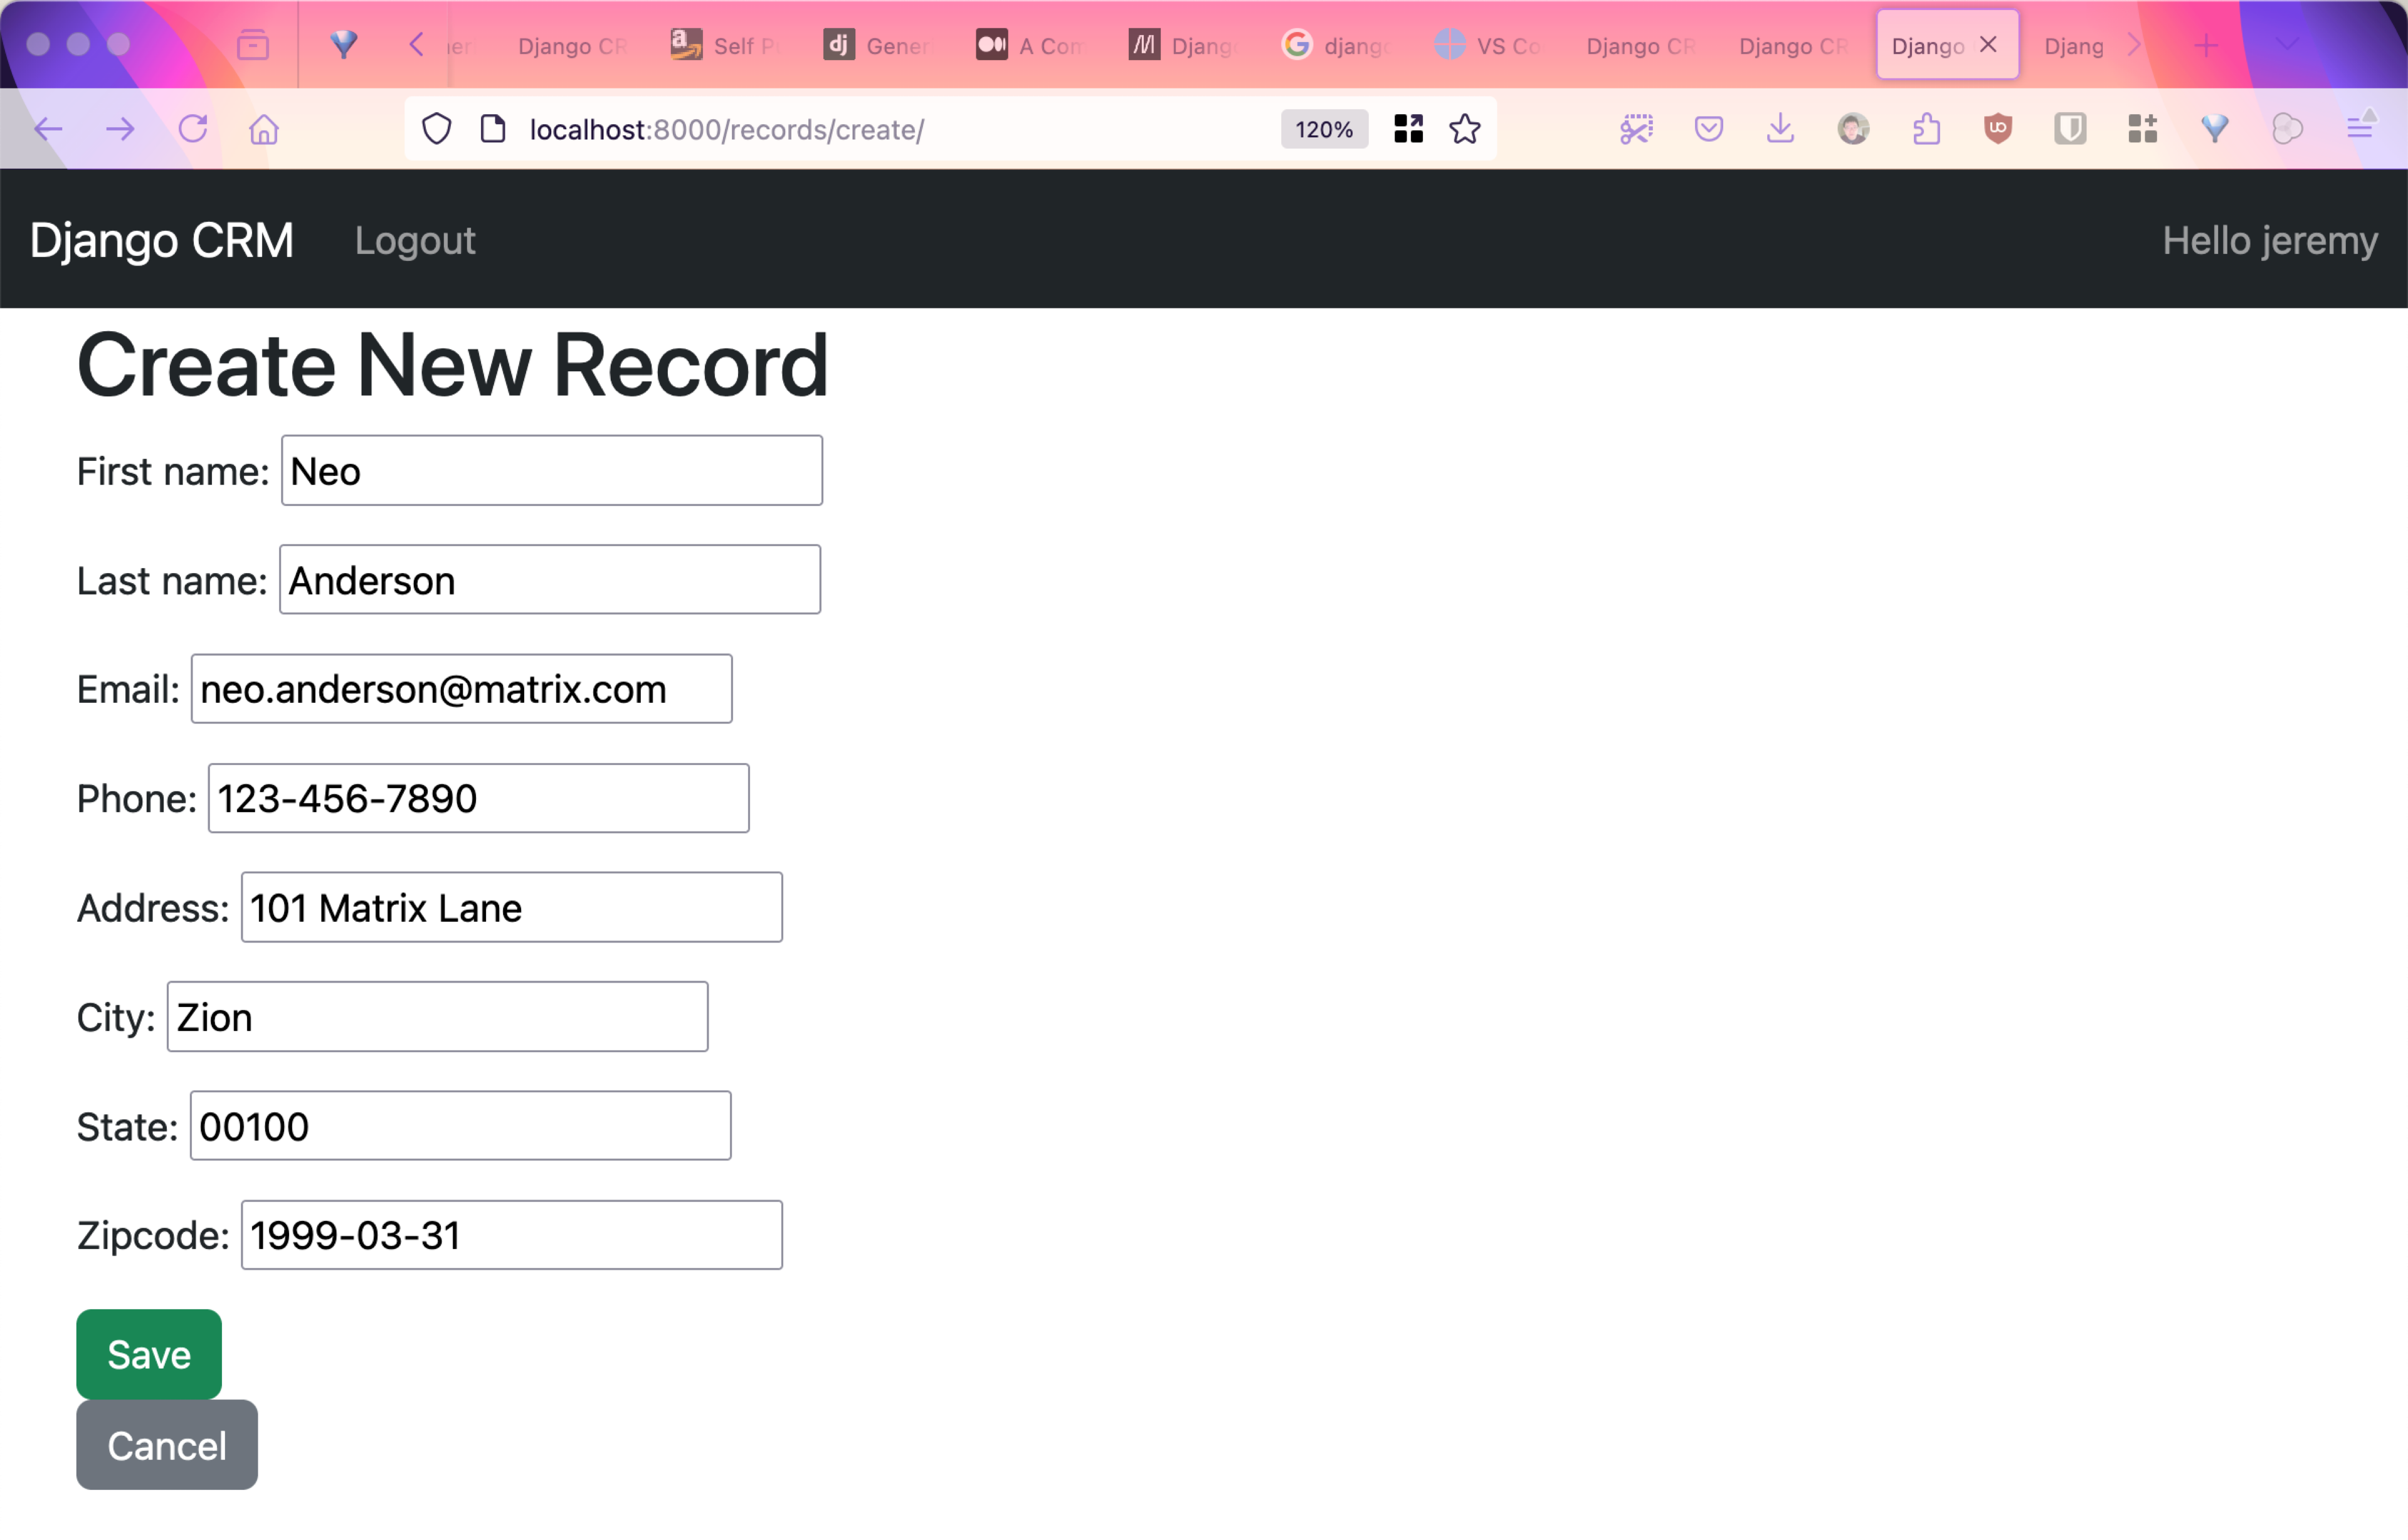
<h1>Create New Record</h1>
<form method="post">
{% csrf_token %}
{{ form.as_p }}
<button type="submit" class="btn btn-success">Save</button>
</form>
<a href="{% url 'record_list' %}" class="btn btn-secondary">Cancel</a>
{% endblock %}4.10.1.5 Record Create Page
4.10.2 Build Update View
We will reuse the RecordForm class and record_form.html template.
4.10.2.1 URL Path for Update View
from django.urls import path
from . import views

urlpatterns = [
    path('', views.home, name='home'),
    path('records/', views.record_list, name='record_list'),
    path('records/<int:pk>/', views.record_detail, name='record_detail'),
    path('records/create/', views.record_create, name='record_create'),
    path('records/<int:pk>/update/', views.record_update, name='record_update'),
]
4.10.2.2 Record Update View
Add the following code to views.py
def record_update(request, pk):
record = get_object_or_404(Record, pk=pk)
if request.method == "POST":
form = RecordForm(request.POST, instance=record)
if form.is_valid():
form.save()
return redirect('record_detail', pk=record.pk)
else:
form = RecordForm(instance=record)
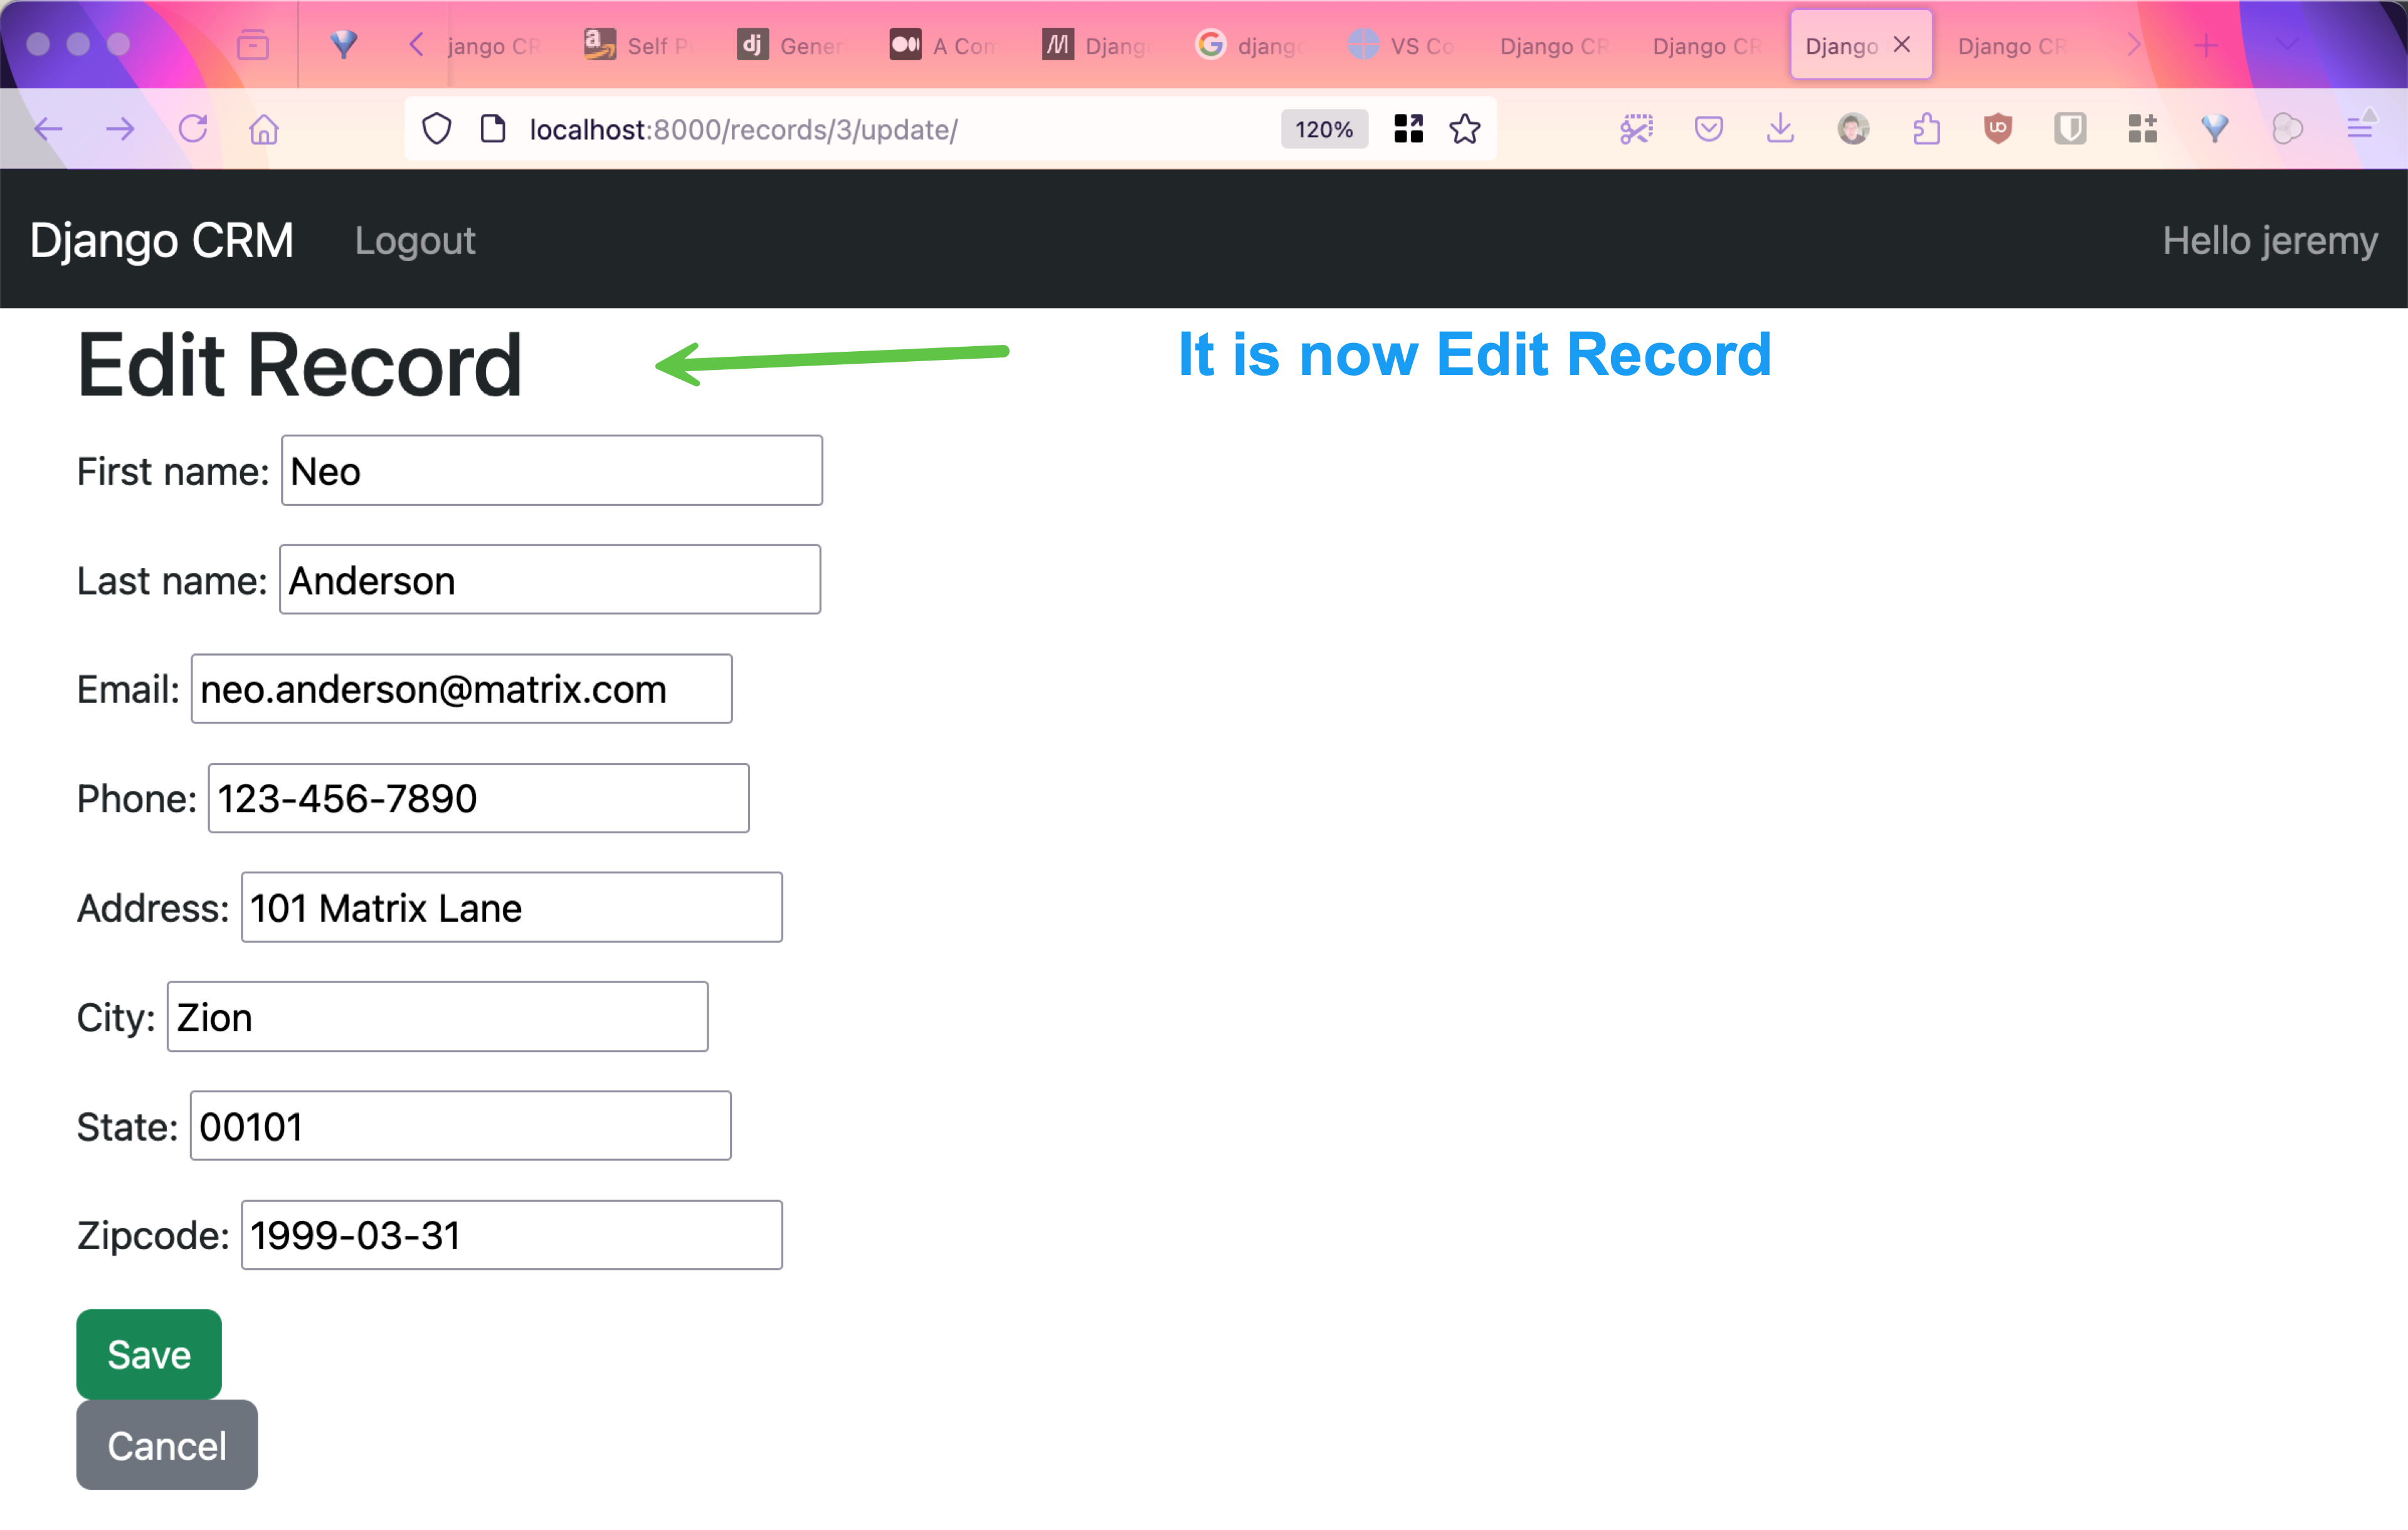
return render(request, 'crm/record_form.html', {'form': form})4.10.2.3 Wrong Record Update Page
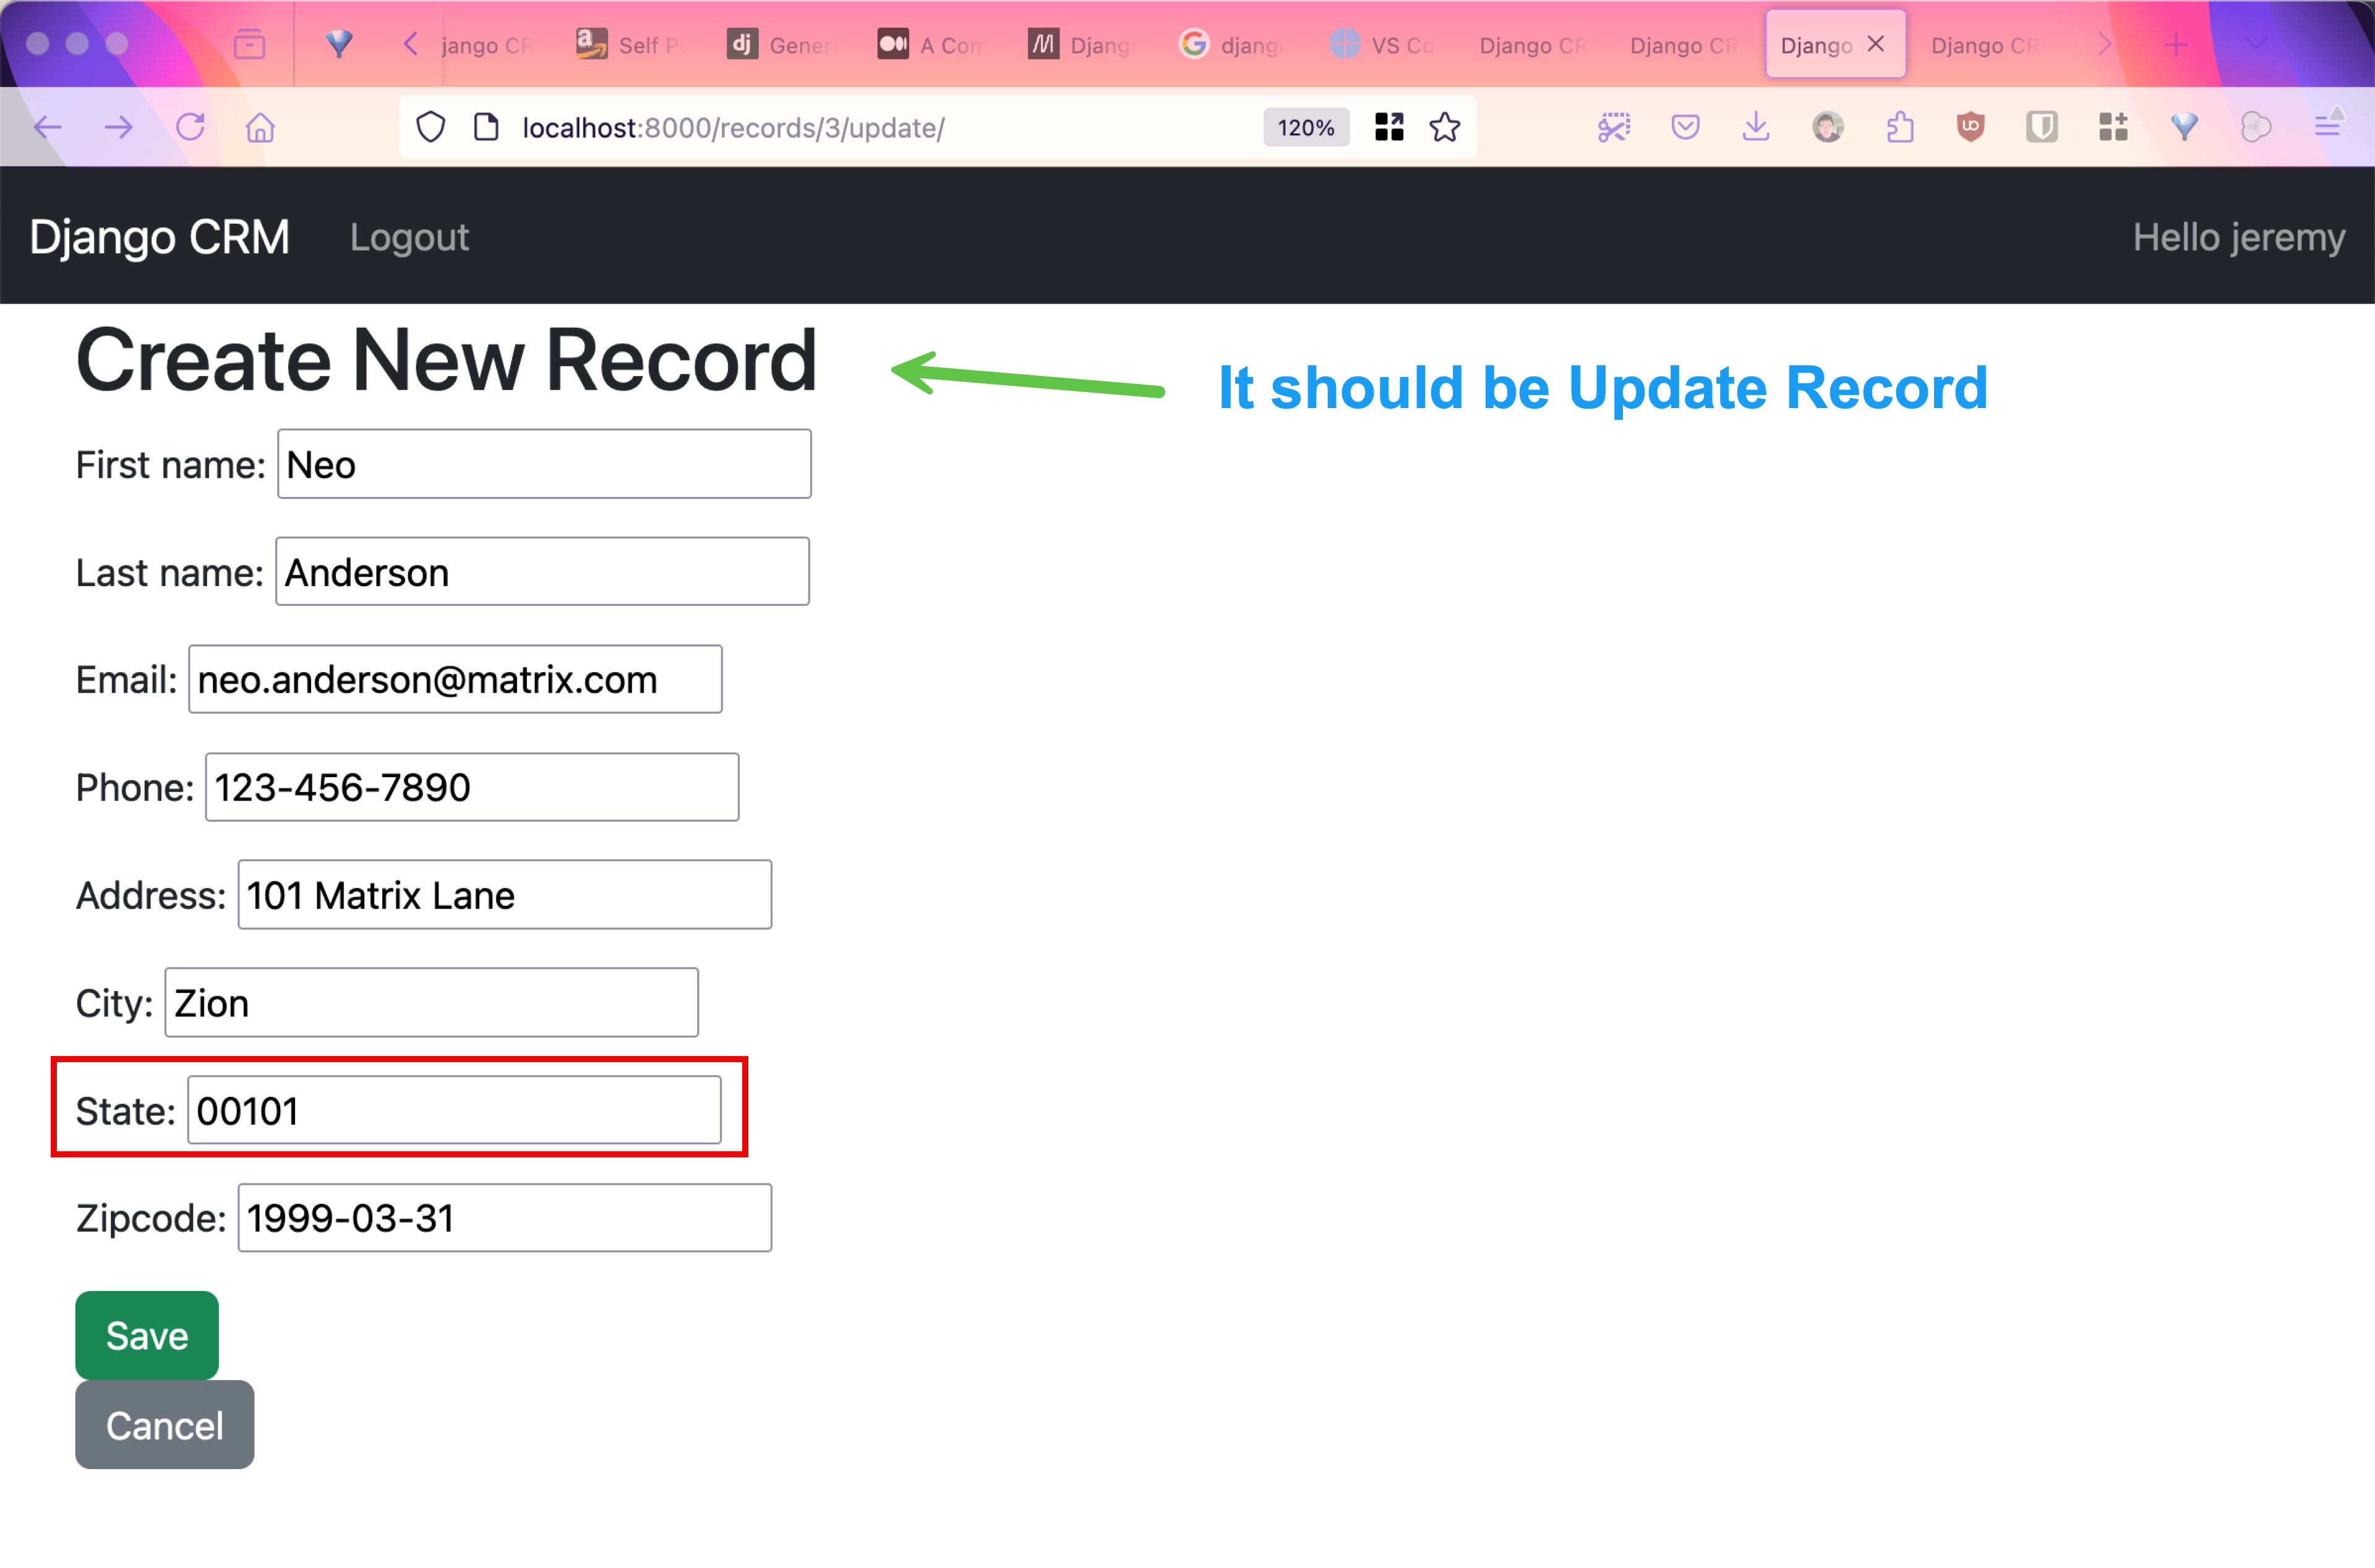
4.10.2.4 Fix Template
Change this line
<h1>Create New Record</h1>To this
<h1>{% if form.instance.pk %}Edit Record{% else %}Create New Record{% endif %}</h1>4.10.2.5 Correct Record Update Page
4.10.3 Build Delete View
4.10.3.1 URL Path for Delete View
from django.urls import path
from . import views

urlpatterns = [
    path('', views.home, name='home'),
    path('records/', views.record_list, name='record_list'),
    path('records/<int:pk>/', views.record_detail, name='record_detail'),
    path('records/create/', views.record_create, name='record_create'),
    path('records/<int:pk>/update/', views.record_update, name='record_update'),
    path('records/<int:pk>/delete/', views.record_delete, name='record_delete'),
]
4.10.3.2 Record Delete View
def record_delete(request, pk):
record = get_object_or_404(Record, pk=pk)
if request.method == "POST":
record.delete()
return redirect('record_list')
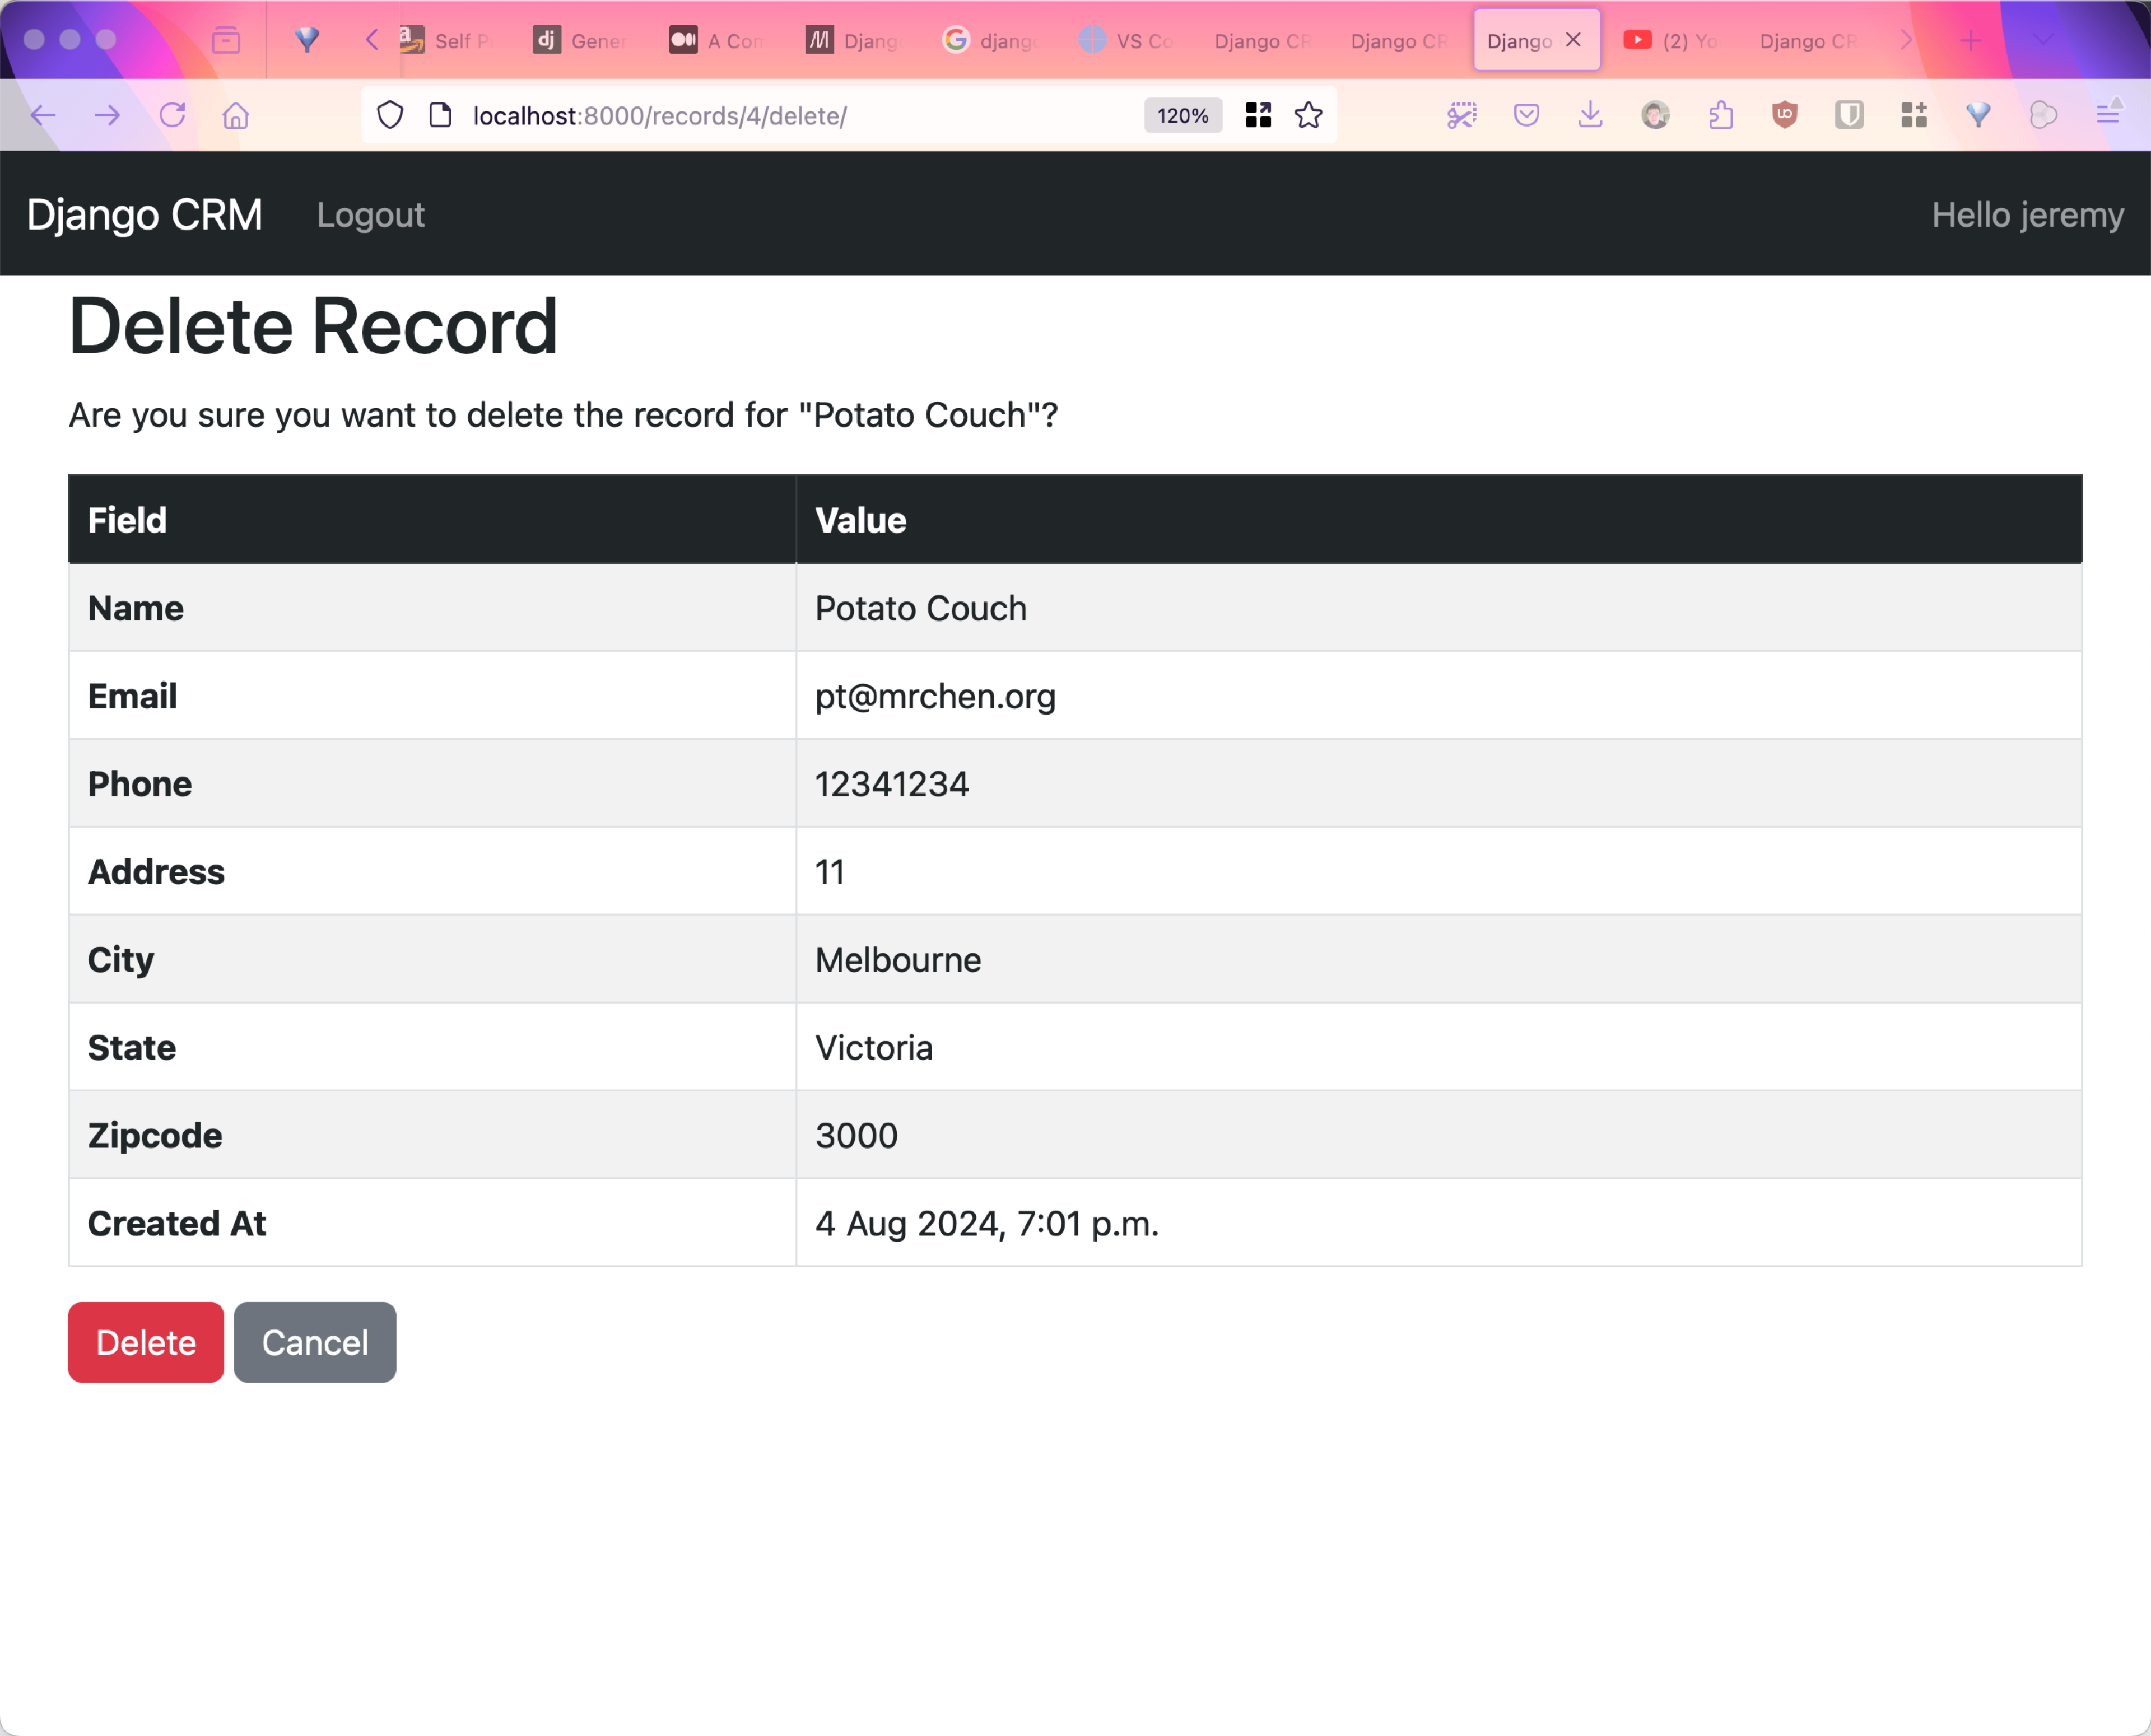
return render(request, 'crm/record_confirm_delete.html', {'record': record})4.10.3.3 Record Delete Template
<!-- templates/crm/record_confirm_delete.html -->

{% extends 'base.html' %}

{% block content %}
    <h1>Delete Record</h1>
    <p>Are you sure you want to delete the record for "{{ record.first_name }} {{ record.last_name }}"?</p>
    <form method="post">
        {% csrf_token %}
        <button type="submit" class="btn btn-danger">Delete</button>
        <a href="{% url 'record_list' %}" class="btn btn-secondary">Cancel</a>
    </form>
{% endblock %}
4.10.3.4 Record Delete Page
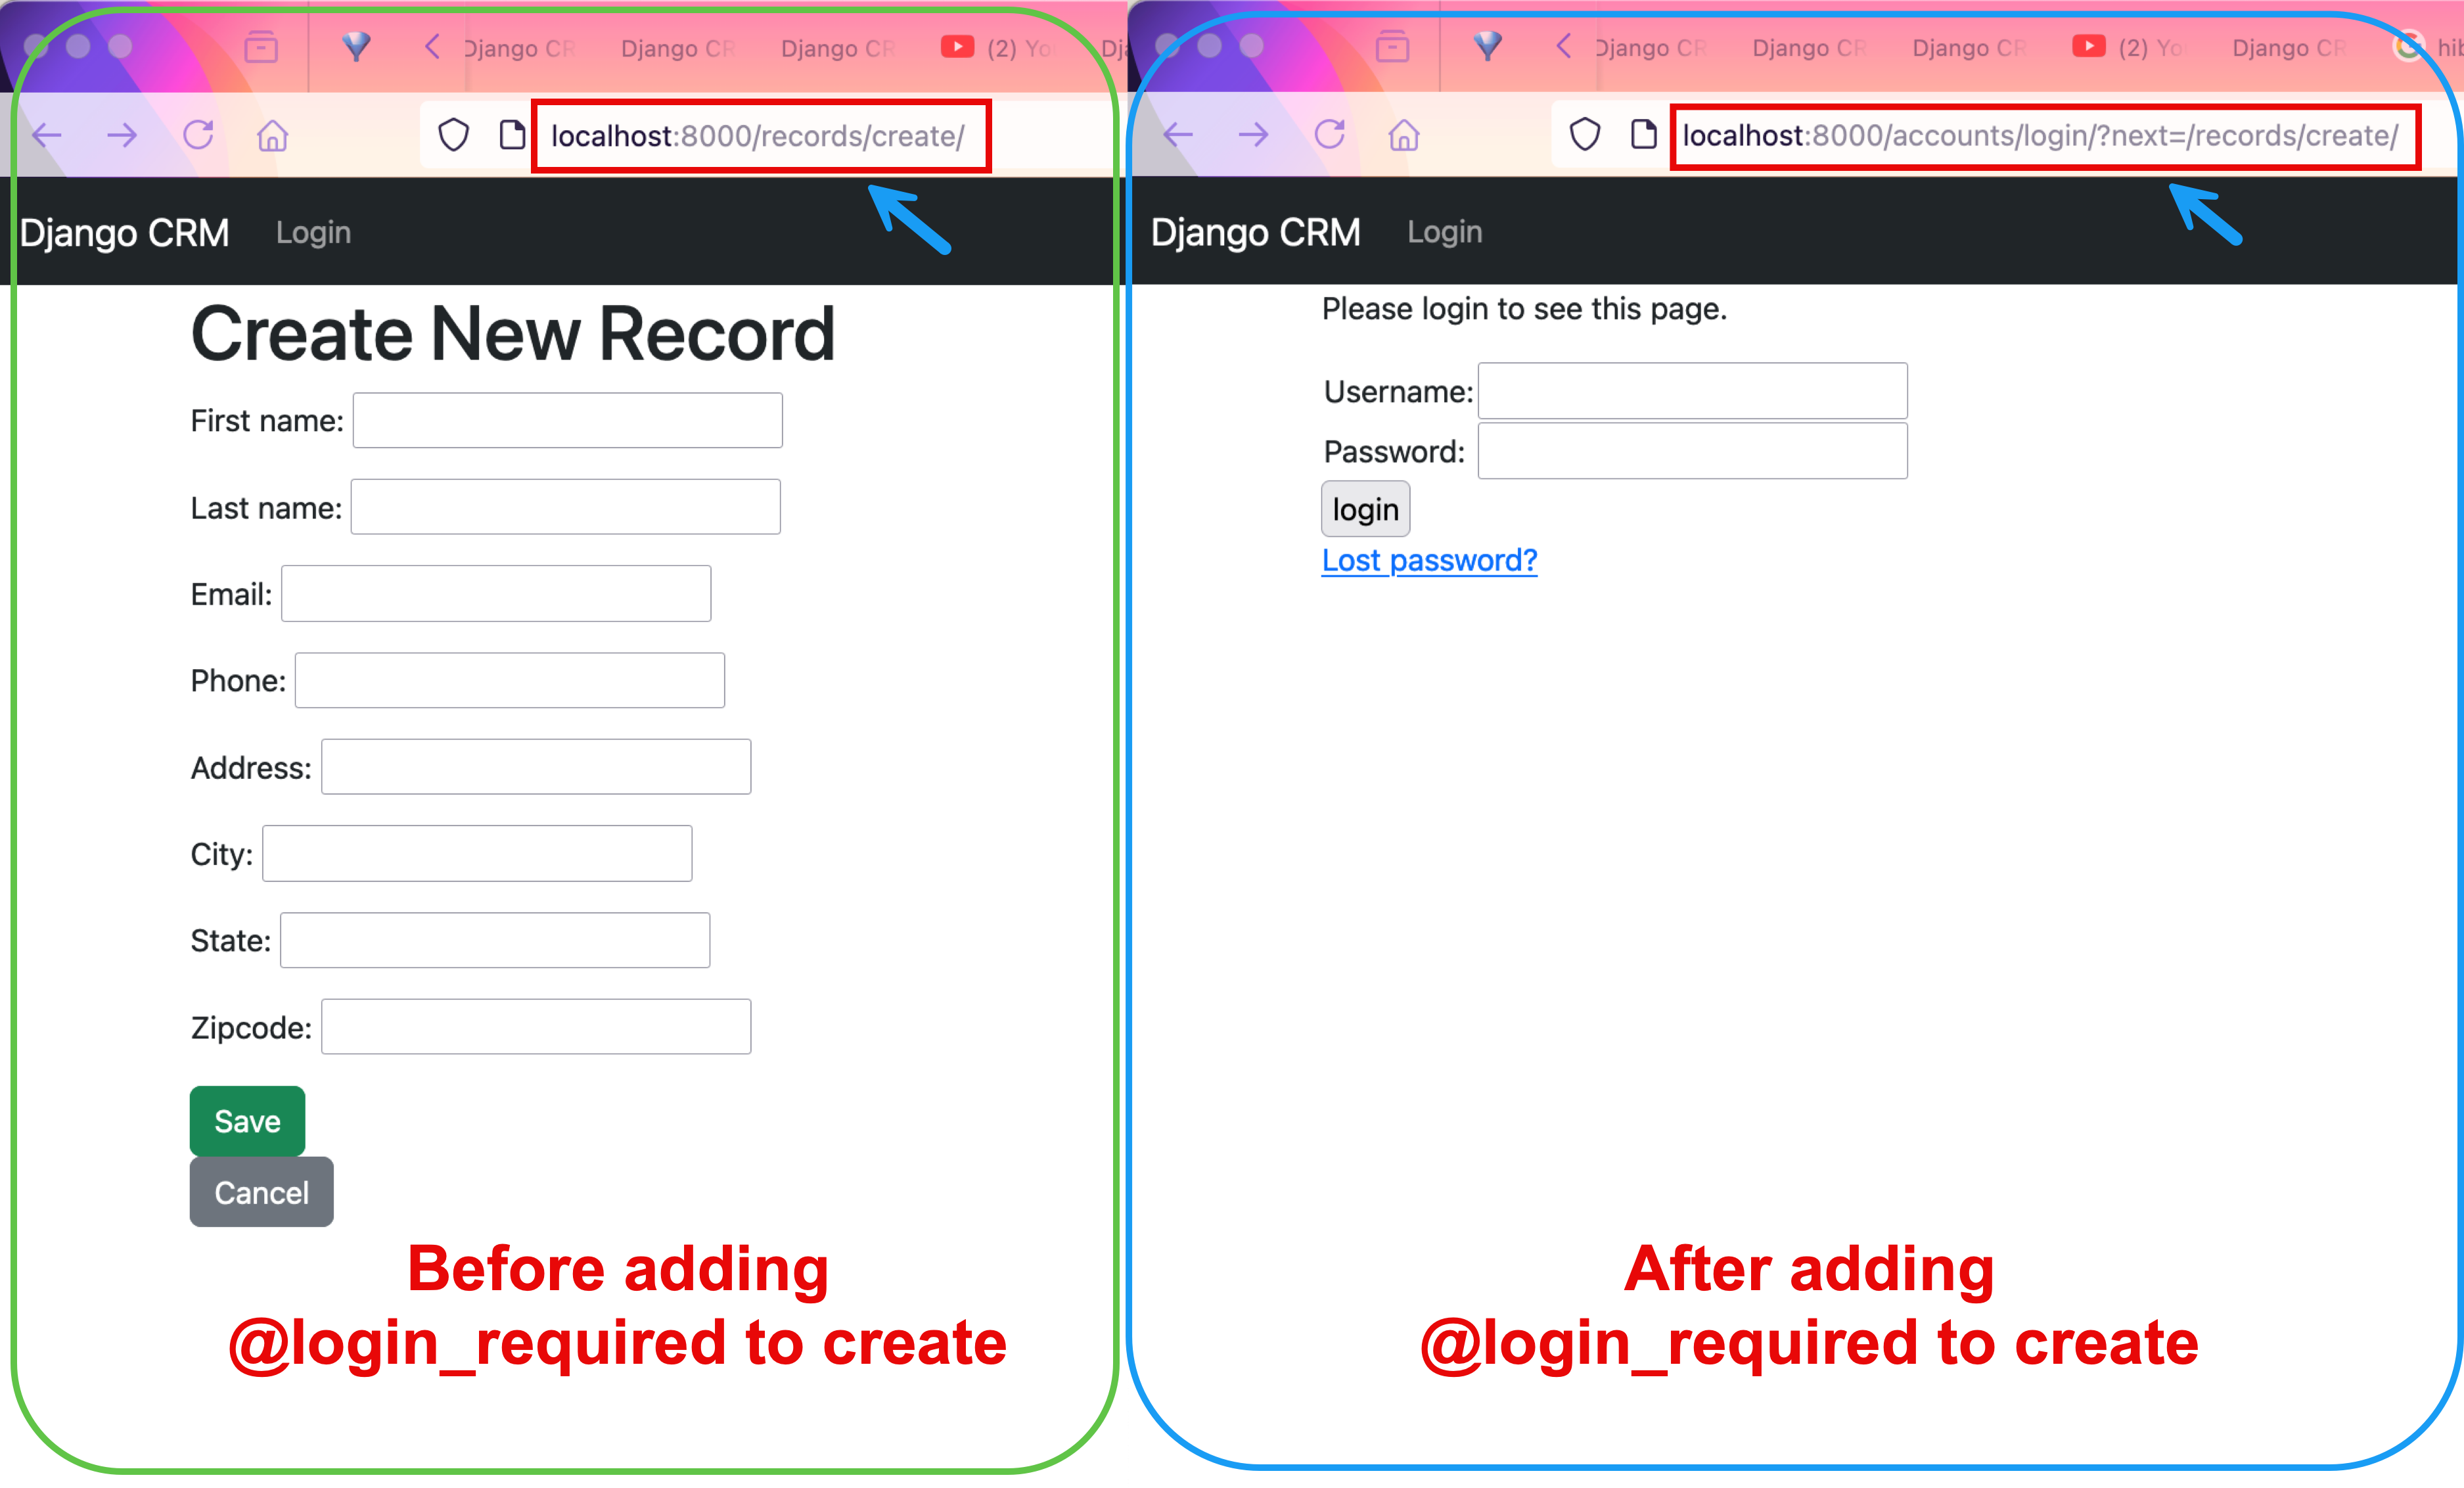
4.10.4 Securing Views
We can secure views with Django’s authentication system.
In Django, you can use the built-in authentication system to ensure that only authorized users can access specific views or perform particular tasks. This is important for maintaining the security and integrity of your application. Here’s how you can restrict access to certain views using the @login_required decorator.
Example:
from django.contrib.auth.decorators import login_required


@login_required
def record_create(request):
    """Allows only logged-in users to create a new record."""
    if request.method == "POST":
        form = RecordForm(request.POST)
        if form.is_valid():
            form.save()
            return redirect('record_list')
    else:
        form = RecordForm()
    return render(request, 'crm/record_form.html', {'form': form})
4.10.4.1 Adding authorisation
4.10.5 Tie CRUD Views Together
In a Django application, views play a crucial role in handling requests and providing responses based on the application logic. Here’s a breakdown of how different views work together to create, read, update, and delete records in a typical Django CRM application:
4.10.5.1 Record List View
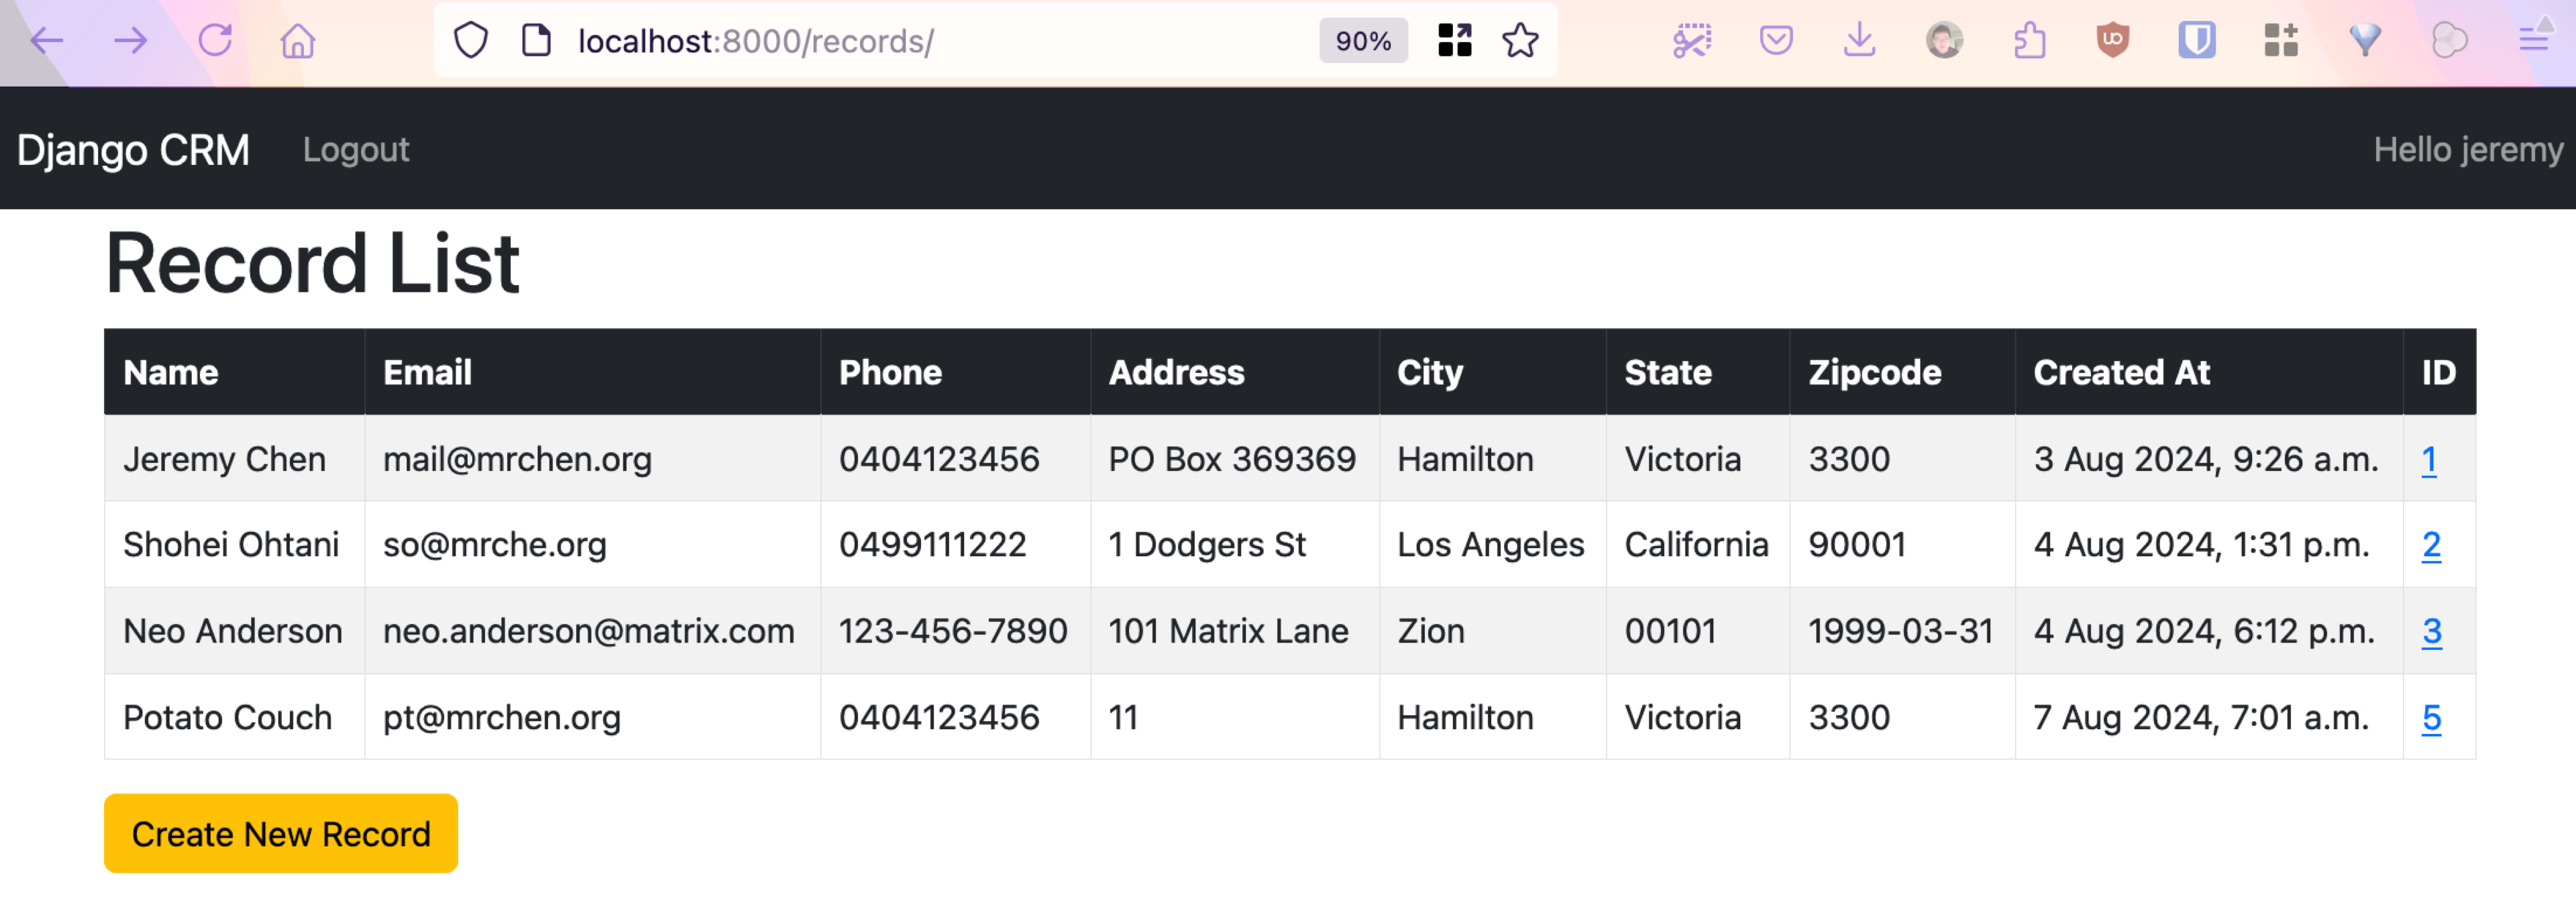
The record_list view serves as the main interface for users to interact with the records. It displays a list of all available records in a table format. Key features of this view include:
- Clickable IDs: Each record in the list has a clickable ID or name that links to the
record_detailview, allowing users to view more information about a specific record. - Create Button: A “Create New Record” button is prominently displayed, allowing users to navigate to the
record_createview to add a new record.
4.10.5.2 Record Detail View

The record_detail view provides detailed information about a specific record selected from the list. It includes:
- Back to List Button: A button to return to the
record_listview, enabling easy navigation back to the list of records. - Update Button: A button to edit the current record, linking to the
record_updateview, where changes can be made. - Delete Button: A button to delete the current record, prompting a confirmation dialog before proceeding to the
record_deleteview.
4.10.5.3 Create and Update Views
The record_form.html template is used for both creating and updating records. This dual-purpose template features:
- Create or Update: The form will be empty when creating a new record and pre-filled with existing data when updating a record. For updates, a primary key is passed from the
record_updateview. - Save Button: Submits the form data, creating a new record or updating an existing one.
- Cancel Button: Allows users to cancel the operation and return to the previous view without making changes.
4.10.5.4 Delete View
The delete_view is responsible for handling record deletions. It includes:
- Confirmation Pop-up: Before deleting a record, the user is prompted with a confirmation pop-up to prevent accidental deletions. This dialog ensures that the user wants to proceed with the deletion operation.
4.10.6 Summary
These views work together to provide a complete CRUD (Create, Read, Update, Delete) interface for managing records within your Django application. Understanding how these views interact helps students appreciate the flow and structure of web applications, enhancing their ability to build robust and user-friendly interfaces.
4.10.6.1 Files to Change:
$ git diff-tree --no-commit-id --name-only -r 2fac8257
crm/views.py
templates/crm/record_detail.html
templates/crm/record_list.html
You can also go to Github and see differences in code: Code Difference
Update record_list.html:
{% extends 'base.html' %}

{% block content %}
    <h1>Record List</h1>
    <table class="table table-striped table-hover table-bordered">
        <thead class="table-dark">
        <tr>
            <th scope="col">Name</th>
            <th scope="col">Email</th>
            <th scope="col">Phone</th>
            <th scope="col">Address</th>
            <th scope="col">City</th>
            <th scope="col">State</th>
            <th scope="col">Zipcode</th>
            <th scope="col">Created At</th>
            <th scope="col">ID</th>
        </tr>
        </thead>
        <tbody>
        {% if records %}
            {% for record in records %}
                <tr>
                    <td>{{ record.first_name }} {{ record.last_name }}</td>
                    <td>{{ record.email }}</td>
                    <td>{{ record.phone }}</td>
                    <td>{{ record.address }}</td>
                    <td>{{ record.city }}</td>
                    <td>{{ record.state }}</td>
                    <td>{{ record.zipcode }}</td>
                    <td>{{ record.created_at }}</td>
                    <td><a href="{% url 'record_detail' record.pk %}">{{ record.id }}</a></td>
                </tr>
            {% endfor %}
        {% else %}
            <tr>
                <td colspan="9">No records found.</td>
            </tr>
        {% endif %}
        </tbody>
    </table>
    <div class="mb-3">
        <a href="{% url 'record_create' %}" class="btn btn-warning">Create New Record</a>
    </div>
{% endblock %}
Update record_detail.html:
{% extends 'base.html' %}

{% block content %}
    <h1>Record Details</h1>
    <table class="table table-striped table-hover table-bordered">
        <thead class="table-dark">
        <tr>
            <th scope="col">Field</th>
            <th scope="col">Value</th>
        </tr>
        </thead>
        <tbody>
        <tr>
            <th>Name</th>
            <td>{{ record.first_name }} {{ record.last_name }}</td>
        </tr>
        <tr>
            <th>Email</th>
            <td>{{ record.email }}</td>
        </tr>
        <tr>
            <th>Phone</th>
            <td>{{ record.phone }}</td>
        </tr>
        <tr>
            <th>Address</th>
            <td>{{ record.address }}</td>
        </tr>
        <tr>
            <th>City</th>
            <td>{{ record.city }}</td>
        </tr>
        <tr>
            <th>State</th>
            <td>{{ record.state }}</td>
        </tr>
        <tr>
            <th>Zipcode</th>
            <td>{{ record.zipcode }}</td>
        </tr>
        <tr>
            <th>Created At</th>
            <td>{{ record.created_at }}</td>
        </tr>
        <tr>
            <th>ID</th>
            <td>{{ record.id }}</td>
        </tr>
        </tbody>
    </table>
    <a href="{% url 'record_list' %}" class="btn btn-primary">Back to List</a>
    <a href="{% url 'record_update' record.pk %}" class="btn btn-warning">Update</a>
    <form action="{% url 'record_delete' record.pk %}" method="post" style="display:inline;">
        {% csrf_token %}
        <button type="submit" class="btn btn-danger"
                onclick="return confirm('Are you sure you want to delete this record?');">Delete
        </button>
    </form>
{% endblock %}
4.11 MVP - CRUD: Concept
4.11.1 SQL CRUD Operations
This guide demonstrates how CRUD (Create, Read, Update, Delete) operations can be performed in SQL, corresponding to actions you would perform in Django views. These SQL statements assume you have a table named Record with fields similar to those in your Django model.
Assume the Record table has the following columns:
id(primary key, integer)first_name(string)last_name(string)email(string)phone(string)address(string)city(string)state(string)zipcode(string)created_at(timestamp)
4.11.2 1. Create (Insert)
To add a new record to the Record table:
INSERT INTO Record (first_name, last_name, email, phone, address, city, state, zipcode, created_at)
VALUES ('Neo', 'Anderson', 'neo.anderson@matrix.com', '123-456-7890', '101 Matrix Lane', 'Zion', 'Free State', '00100', NOW());
4.11.3 2. Read (Select)
To retrieve all records from the Record table:
SELECT * FROM Record;To retrieve a specific record by id:
SELECT * FROM Record WHERE id = 1;4.11.4 3. Update
To update an existing record, such as changing Neo’s email address:
UPDATE Record
SET email = 'neo.anderson@realmatrix.com',
    phone = '987-654-3210'
WHERE id = 1;
4.11.5 4. Delete
To delete a record from the table:
DELETE FROM Record WHERE id = 1;4.11.6 Explanation
- INSERT: Adds a new row to the table. The
VALUESclause specifies the data for each column, corresponding to the fields of a form submission in Django. - SELECT: Retrieves data from the table. You can select all rows or filter by conditions such as
WHERE id = 1to get specific records. - UPDATE: Modifies existing data in the table. The
SETclause specifies which columns to update and their new values, akin to editing a form in Django. - DELETE: Removes a row from the table based on a condition, like confirming a delete action in Django.
By understanding both Django and SQL, you gain a deeper understanding of how data is manipulated at both the application and database levels.